


Last Updated on 9월 15, 2023 by Jade(정현호)
안녕하세요
이번 포스팅은 InnoDB Cluster 구성(설치)에 관해서 내용을 확인해보려고 합니다.
연재 포스팅 글로 아래 이전 글에서부터 이어지는 글입니다.

Contents
MySQL Router
MySQL 라우터는 InnoDB 클러스터의 일부 이기도 하며, 애플리케이션과 백엔드 MySQL 서버 간에 투명한 라우팅을 제공하는 경량 미들웨어입니다. 클라이언트나 애플리케이션으로 부터 쿼리 요청을 InnoDB 클러스터내에서 적절한 인스턴스로 전달하며, 결과를 클라리언트나 애플리케이션에게 다시 전달하는 Proxy 역할을 하게 됩니다.
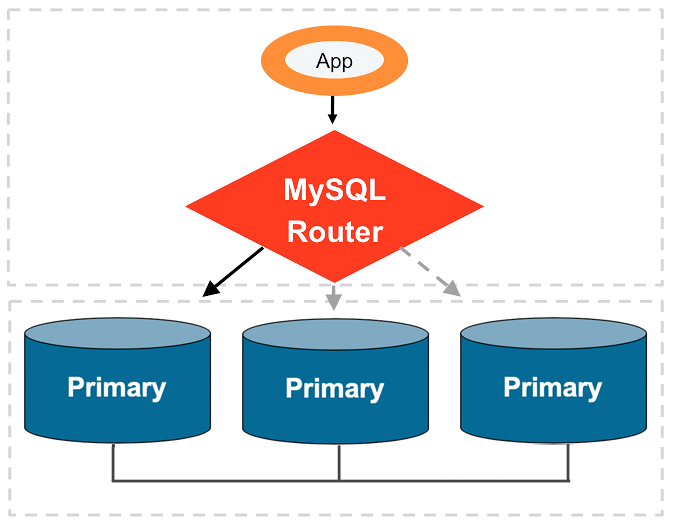
[MySQL Router transparently routes connections within a high availability group]
InnoDB 클러스터 설치 이전에 클러스터 구성 요소에 대해서 조금 더 확인해보고 진행하도록 하겠습니다.
MySQL 라우터는 데이터베이스로 유입되는 트래픽을 적절한 백엔드 MySQL 서버로 효과적으로 라우팅하여 고가용성 및 확장성을 제공하는 등 다양한 사용 사례가 있습니다.
MySQL 라우터는 다음과 같은 기능으로 사용됩니다.
- 쿼리에 대한 로드 밸런스(부하분산)
- 자동 페일 오버
- InnoDB 클러스터의 구성변경 감지
MySQL 라우터와 같은 미들웨어 또는 프록시를 사용하지 않을 경우 클라이언트나 애플리케이션은 MySQL 서버로 직접 접속을 하게 되며 HA 시스템(MHA 나 MySQL Orchestrator 등) 등에 의한 Role 변경(또는 Failover) 이나 Secondary(Replica) 인스턴스의 추가 나 변경시에 애플리케이션 등에 설정된 내용을 사용자가 계속 적인 변경이 필요하게 됩니다.
MySQL 라우터 와 같은 Proxy 미들웨어를 이용하게 되면 애플리케이션이나 클라이언트는 접속에 대한 포인트를 MySQL 라우터로만 지정하여 사용할 수 있어서 백엔드 MySQL 변경에 대해서 수정이나 변경에 대한 부분이 매우 적어지게 되고 유연하게 대처가 가능해집니다.
MySQL 라우터는 애플리케이션과 MySQL 서버 사이에 위치하여 동작하며, 애플리케이션은 일반적인 MySQL 서버에 연결하는 것처럼 정상적으로 라우터에 연결합니다. 애플리케이션이 MySQL 라우터에 연결할 때마다 라우터는 알고 있는 후보 풀에서 적절한 MySQL 서버를 선택한 다음 연결합니다. 그 순간부터 라우터는 응답을 포함하여 애플리케이션과 MySQL 간의 모든 네트워크 트래픽을 전달합니다.
MySQL 라우터는 온라인 MySQL 서버의 캐시 목록 또는 구성된 InnoDB 클러스터의 토폴로지 및 상태를 유지합니다. 처음에는 라우터가 시작될 때 라우터의 구성 파일에서 목록이 로드 됩니다.
캐시를 업데이트된 상태로 유지하기 위해 메타데이터 캐시 구성 요소는 메타데이터가 포함된 InnoDB 클러스터 서버 중 하나에 대한 열린 연결을 유지합니다. MySQL의 성능 스키마에서 메타데이터 데이터베이스 및 라이브 상태 정보를 쿼리하여 수행합니다.
캐시를 업데이트된 상태로 유지하기 위해 메타데이터 캐시 구성 요소는 메타 데이터가 포함된 InnoDB 클러스터 서버 중 하나에 대한 오픈 커넥션을 유지합니다. MySQL의 performance schema 에 쿼리를 수행하여 메타데이터 데이터베이스 및 라이브 상태 정보를 확인합니다.
클러스터 메타데이터는 MySQL Shell을 사용하여 MySQL 서버를 추가하거나 제거하는 등 InnoDB 클러스터가 수정될 때마다 변경되며, performance_schema 테이블은 클러스터 상태 변경이 감지될 때마다 MySQL 서버의 Group Replication 플러그인에 의해 실시간으로 업데이트 됩니다.(예를 들어 MySQL 서버 중 하나가 예기치 않게 종료된 경우)
라우터가 연결된 MySQL 서버가 종료되었음을 감지하면, 예를 들어 메타데이터 캐시가 연결이 끊어져 다시 연결할 수 없기 때문에 라우터는 다른 MySQL 서버에 연결하여 새 MySQL 서버에서 메타데이터 및 InnoDB 클러스터 상태를 가져오려고 시도합니다.
종료된 MySQL 서버에 대한 애플리케이션 연결은 자동으로 닫힙니다. 그런 다음 라우터에 다시 연결시에 온라인 된 MySQL 서버로 리디렉션 되게 됩니다. 이와 같이 MySQL 라우터가 클러스터내 발생되는 현상에 따라서 적절한 조치를 하기 때문에 사용자나 애플리케이션에는 MySQL 접속과 사용을 손쉽게 할 수 있게 됩니다.
MySQL 라우터는 Proxy 미들웨어이기 때문에 주요 사용 용도 또는 기능으로 로드밸런스 가 있습니다. 여러 대의 서버가 있을 경우 나누어서 부하부산이 이루어지도록 할 수 있습니다.
MySQL Shell
MySQL Shell 은 MySQL 용 고급 클라이언트 및 코드 편집기입니다.
MySQL 클라이언트 와 유사한 SQL 기능 외에도 MySQL Shell은 JavaScript 및 Python에 대한 스크립팅 기능을 제공하고 MySQL 작업을 위한 API를 포함합니다.
MySQL Shell은 MySQL Server 5.7 과 8.0 버전에서 사용이 가능 합니다.
MySQL Shell 8.0 is highly recommended for use with MySQL Server 8.0 and 5.7
MySQL Shell의 여러 기능 중에 Utility 기능이 있으며 그 중에서도 Dump 와 Load utility 에 대해서는 이전 포스팅을 참조해 보셔도 좋을 것 같습니다.
그리고 많이 사용되는 기능으로 MySQL 서버 인스턴스가 업그레이드할 준비가 되었는지 확인하는 util.checkForServerUpgrade() 유틸리티를 제공하고 있습니다.
Dump, Load Utility 이외 다양한 기능을 제공하고 있으며, MySQL 서버에 대해 쉽고 편리하게 작업할 수 있도록 API 를 제공하고 있으며 X Protocol(기본 포트 : 33060) 를 이용해서 Document 기반의 데이터 처리인 X DevAPI 를 사용하거나 InnoDB 클러스터 구성/관리 와 같은 MySQL AdminAPI 기능을 제공하고 있습니다.
AdminAPI를 사용하면 MySQL 인스턴스를 관리하여 InnoDB 클러스터, InnoDB ClusterSet 및 InnoDB ReplicaSet 배포를 생성하고 MySQL 라우터를 통합할 수 있습니다.
InnoDB 클러스터에서 MySQL Shell 의 주요 기능은 다음과 같습니다.
- 모든 백스테이지 작업 구성 및 수행
- 클러스터 생성
- 클러스터에 인스턴스 추가 및 제거
- 클러스터 모니터링
- 클러스터 관리
- 인스턴스에 대한 쿼리, 업데이트 및 관리 작업을 수행
InnoDB Cluster를 사용하는 환경에서는 기본 3306 이외 사용하는 포트가 더 많이 있으며 더 자세한 내용은 아래 문서를 참고하시면 됩니다.
InnoDB Cluster 설치
InnoDB Cluster 는 앞에서 설명한 내용과 같이 MySQL 라우터, MySQL Shell , Group Replication 을 이용하게 되며, InnoDB Cluster 를 구성하기 위해서는 몇 가지 요구사항이 있습니다.
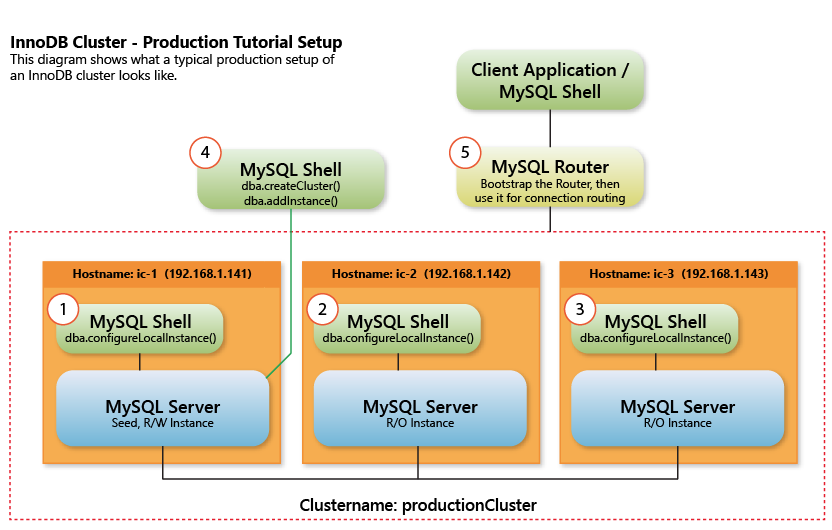
[mysql-innodb-cluster-setting-up-a-real-world-cluster]
위의 다이어그램은 InnoDB 클러스터의 일반적인 프로덕션 설정이 어떻게 되는지를 보여줍니다.
요구사항 및 제약사항
InnoDB Cluster 를 설치하기전에 몇 가지 요구 사항이 충족되는지 확인이 필요할 수 있습니다.
먼저 최소 요구되는 버전 정보는 다음과 같습니다.
- MySQL Server 5.7.17 or higher
- MySQL Shell 1.0.8 or higher
- MySQL Router 2.1.2 or higher
InnoDB 클러스터 에서는 Group Replication 을 사용함으로 Group Replication 에 대한 요구 사항 또는 제약사항에 대해서도 확인이 필요 합니다.
InnoDB Cluster 사용할 데이터는 Group Replication 과 동일하게 InnoDB 스토리지 엔진을 사용해야 합니다. 다른 스토리지 엔진 또는 임시성 MEMORY 스토리지 엔진을 사용할 경우 Group Replication 에서 문제가 발생되게 됩니다.
테이블이 다른 스토리지 엔진을 사용한다면 InnoDB 클러스터 구성전에 테이블의 스토리지 엔진의 변경이 필요 합니다. MySQL 서버 인스턴스에서 disabled_storage_engines 시스템 변수를 설정하여 다른 스토리지 엔진의 사용을 방지할 수 있습니다.
예시)
disabled_storage_engines="MyISAM,BLACKHOLE,FEDERATED,ARCHIVE,MEMORY"
클러스터를 설정할 때 서버 인스턴스에 인바운드 복제 채널이 없어야 합니다.
그룹 복제( group_replication_applier및 group_replication_recovery)에 의해 자동으로 생성된 채널은 채택 중인 복제 그룹에서 허용됩니다. InnoDB 클러스터는 AdminAPI를 사용하여 관리되는 채널 이외의 수동으로 구성된 비동기 복제 채널을 지원하지 않습니다.
group_replication_tls_source는 mysql_admin으로 설정하면 안 됩니다.
모든 인스턴스에서 performance schema 를 활성화해야 합니다.
MySQL Shell 이 InnoDB 클러스터 구성하는데 사용되는 프로비저닝 스크립트 실행을 위해서 python 2.7 또는 이상 버전이 필요 합니다.
MySQL 8.0.17 버전부터는 인스턴스의 server_id 는 클러스터내에서 고유 한 것을 사용해야 합니다. 클러스터내에서 이미 사용 중이라면(중복된다면) 오류와 함께 작업이 실패하게 됩니다.
MySQL 8.0.23 부터는 병렬 복제(Parallel Replication) 을 사용하도록 인스턴스를 구성(설정) 해야 합니다.
자세한 내용은 다음 공식문서 를 참조하시면 됩니다.
구성을 진행 과정에서 InnoDB Cluster 를 위해서 인스턴스에서 필요한 시스템 변수는 대부분 설정을 하게 됩니다.
그러나 AdminAPI 는 transaction_isolation 시스템 변수를 설정하지 않습니다. 즉, 기본값인 REPEATABLE READ 입니다. 이것은 단일 기본 클러스터(single-primary cluster) 에 영향을 미치지 않지만 다중 기본 클러스터(multi-primary cluster)를 사용하는 경우 애플리케이션에서 REPEATABLE READ 격리 수준에 의존하지 않는 한 READ COMMITTED 격리 수준을 사용하는 것이 권장하고 있습니다.
이 부분에 대해서 더 자세한 내용은 그룹 복제 제한 사항을 참조하시면 됩니다.
인스턴스에 대한 관련 구성 옵션, 특히 그룹 복제 구성 옵션은 단일 옵션 파일(my.cnf)에 있어야 합니다. InnoDB 클러스터는 서버 인스턴스에 대해 단일 옵션 파일만 지원하며 --defaults-extra-file 옵션을 사용하여 추가 옵션 파일을 지정하는 것은 지원하지 않습니다.
[참고] 포스팅에서는 사용한 버전은 다음과 같으며 모두 Community Edition 을 사용하였습니다.
- OS : Rocky Linux 8.6
- MySQL : 8.0.23
- MySQL Shell 8.0.23
- MySQL Router 8.0.23
- 서버 구성 : 클러스터 구성을 위해서 3대, MySQL Router 를 위해 1대 해서 총 4대를 사용
MySQL Server 설치
InnoDB Cluster 를 생성하기 위해서는 선제적(기본적) 으로 필요한 구성 요소의 설치가 필요 하며, 이번 챕터에서는 MySQL Server 를 설치하도록 하겠습니다.
MySQL 8.0.23 버전을 사용하였으며 설치 방법은 "바이너리 압축 해제 방식" 으로 진행하였으며 관련된 내용은 아래 포스팅을 참고하시면 됩니다.

위의 포스팅 글 기준으로 추가 또는 변경된 시스템 변수 정보는 아래와 같습니다.
server-id= <--- 서버별로 다른 값
port=3306
bind-address=0.0.0.0
mysqlx=ON
mysqlx-port=33060
mysqlx-bind-address=0.0.0.0
클러스터 구성
클러스터를 구성하기 위해서 먼저 MySQL 서버를 설치하였으며, MySQL 서버 3대+Router 서버1대에 MySQL Shell 설치 완료하였으며, 클러스터 구성을 하도록 하겠습니다.
포스팅에서는 클러스터 구성에 앞에서 구성에 사용한 4대의 서버에서 /etc/hosts 에 호스트 정보를 입력하도록 하겠습니다.(선택사항)
192.168.56.133 ic-server1
192.168.56.134 ic-server2
192.168.56.135 ic-server3
192.168.56.136 ic-router1
Pre-Checking
서버 인스턴스에서 프로덕션 배포를 생성하기 전에 각 인스턴스의 MySQL이 올바르게 구성되었는지 확인해야 합니다.
dba.configureInstance() 기능은 인스턴스 구성의 일부로 이 작업을 수행하지만 선택적으로 기능을 사용할 수 있습니다.
Pre-Cheking 은 실제 인스턴스의 구성을 변경하지는 않으며 인스턴스가 InnoDB "클러스터 구성 요구사항" 에 나열된 요구 사항에 충족하는지를 확인합니다.
MySQL Shell 은 로컬에서도 접속되고 Remote 로도 접속되기 때문에 사용하는 모든 서버에 설치를 하였습니다.
Pre-Checking 을 하기 위해서 mysqlsh 로 접속하겠습니다.
"mysqlsh" 명령어를 통해서 실행하면 됩니다.
user$ mysqlsh
MySQL Shell 8.0.23

Copyright (c) 2016, 2021, Oracle and/or its affiliates.
Oracle is a registered trademark of Oracle Corporation and/or its affiliates.
Other names may be trademarks of their respective owners.

Type '\help' or '\?' for help; '\quit' to exit.
 MySQL  JS >
dba.checkInstanceConfiguration('계정명@호스트명_또는_IP:포트') 형태로 수행을 하면 되며, mysql shelll 의 명령어(메서드)는 대소문자를 구별하고 있습니다.
지금 DB 유저를 별도로 생성하지 않은 상태이며 기본 생성되어 있는 root 계정은 접속할 수 있는 호스트 대역대가 localhost 임으로 각 서버에서 mysqlsh 명령어를 직접 실행해서 접속하도록 하겠습니다.
 MySQL  JS > dba.checkInstanceConfiguration('root@localhost:3306')
Please provide the password for 'root@localhost:3306': ****
Save password for 'root@localhost:3306'? [Y]es/[N]o/Ne[v]er (default No): N
Validating local MySQL instance listening at port 3306 for use in an InnoDB cluster...

This instance reports its own address as ic-server1:3306
Clients and other cluster members will communicate with it through this address by default. If this is not correct, the report_host MySQL system variable should be changed.

Checking whether existing tables comply with Group Replication requirements...
No incompatible tables detected

Checking instance configuration...

NOTE: Some configuration options need to be fixed:
+----------------------------------------+---------------+----------------+--------------------------------------------------+
| Variable                               | Current Value | Required Value | Note                                             |
+----------------------------------------+---------------+----------------+--------------------------------------------------+
| binlog_transaction_dependency_tracking | COMMIT_ORDER  | WRITESET       | Update the server variable                       |
| enforce_gtid_consistency               | OFF           | ON             | Update read-only variable and restart the server |
| gtid_mode                              | OFF           | ON             | Update read-only variable and restart the server |
| slave_parallel_type                    | DATABASE      | LOGICAL_CLOCK  | Update the server variable                       |
| slave_preserve_commit_order            | OFF           | ON             | Update the server variable                       |
+----------------------------------------+---------------+----------------+--------------------------------------------------+

Some variables need to be changed, but cannot be done dynamically on the server.
NOTE: Please use the dba.configureInstance() command to repair these issues.

{
    "config_errors": [
        {
            "action": "server_update",
            "current": "COMMIT_ORDER",
            "option": "binlog_transaction_dependency_tracking",
            "required": "WRITESET"
        },
        {
            "action": "server_update+restart",
            "current": "OFF",
            "option": "enforce_gtid_consistency",
            "required": "ON"
        },
        {
            "action": "server_update+restart",
            "current": "OFF",
            "option": "gtid_mode",
            "required": "ON"
        },
        {
            "action": "server_update",
            "current": "DATABASE",
            "option": "slave_parallel_type",
            "required": "LOGICAL_CLOCK"
        },
        {
            "action": "server_update",
            "current": "OFF",
            "option": "slave_preserve_commit_order",
            "required": "ON"
        }
    ],
    "status": "error"
}
InnoDB Cluster 를 구성하기 위해서 포스팅 테스트 시스템에서의 설정이 필요한 사항이 나열되어 있습니다. 일부 시스템 변수의 경우 재시작으로 적용되는 항목도 존재합니다.
위의 내용을 확인 후에 선제적으로 조치 후 그 다음 Step 으로 진행해도 되며, 다음에 진행할 dba.configureInstance 메서드에서도 설정을 변경할 수 있습니다.
[참고1] skip_name_resolve 이 설정되어 있는 상태에서 root 유저의 127.0.0.1 ip 호스트가 없다면 위의 작업에서 아래와 같은 에러가 발생될 수 있습니다.
 MySQL  JS > dba.checkInstanceConfiguration('root@localhost:3306')
Please provide the password for 'root@localhost:3306': ****
Dba.checkInstanceConfiguration: Host '127.0.0.1' is not allowed to connect to this MySQL server (MySQL Error 1130)
[참고2] skip_name_resolve 설정된 상태에서 localhost 대역 대 root 유저로 진행 시 아래와 같은 에러가 발생하게 됩니다.
 JS > dba.checkInstanceConfiguration('root@localhost:3306')
Please provide the password for 'root@localhost:3306': ****
Save password for 'root@localhost:3306'? [Y]es/[N]o/Ne[v]er (default No): No
Validating local MySQL instance listening at port 3306 for use in an InnoDB cluster...

ERROR: New account(s) with proper source address specification to allow remote connection from all instances must be created to manage the cluster.
Dba.checkInstanceConfiguration: User 'root' can only connect from 'localhost'. (RuntimeError)
 MySQL  JS >
Configuring Instances for Cluster
클러스터 구성을 하기전에 사전에 필요한 요구사항에 대해서 체크 + 설정변경을 할 수 있는 dba.configureInstance 명령어를 진행하도록 하겠습니다.
dba.configureInstance 를 통해서 수동으로 직접 설정 변경 등을 해야 하는 부분에 대해서 MySQL Shell 이 편리하게 설정을 진행해주게 됩니다.
먼저 이전과 같이 mysql shell 로 접속합니다.
user$ mysqlsh
MySQL Shell 8.0.23

Copyright (c) 2016, 2021, Oracle and/or its affiliates.
Oracle is a registered trademark of Oracle Corporation and/or its affiliates.
Other names may be trademarks of their respective owners.

Type '\help' or '\?' for help; '\quit' to exit.
 MySQL  JS >
mysql shell 을 실행 후에 아래와 같이 dba.configureInstance 를 통해 인스턴스에 대한 설정 변경을 진행합니다.
 JS > dba.configureInstance('root@localhost:3306')
Please provide the password for 'root@localhost:3306': ****
Save password for 'root@localhost:3306'? [Y]es/[N]o/Ne[v]er (default No): N
Configuring local MySQL instance listening at port 3306 for use in an InnoDB cluster...

This instance reports its own address as ic-server1:3306
Clients and other cluster members will communicate with it through this address by default.
If this is not correct, the report_host MySQL system variable should be changed.

ERROR: User 'root' can only connect from 'localhost'.
New account(s) with proper source address specification to allow remote connection
from all instances must be created to manage the cluster.

1) Create remotely usable account for 'root' with same grants and password
2) Create a new admin account for InnoDB cluster with minimal required grants
3) Ignore and continue
4) Cancel

Please select an option [1]: 2
Please provide an account name (e.g: icroot@%) to have it created with the necessary
privileges or leave empty and press Enter to cancel.
Account Name: clusteradm
Password for new account: **********
Confirm password: **********

applierWorkerThreads will be set to the default value of 4.

NOTE: Some configuration options need to be fixed:
+----------------------------------------+---------------+----------------+--------------------------------------------------+
| Variable                               | Current Value | Required Value | Note                                             |
+----------------------------------------+---------------+----------------+--------------------------------------------------+
| binlog_transaction_dependency_tracking | COMMIT_ORDER  | WRITESET       | Update the server variable                       |
| enforce_gtid_consistency               | OFF           | ON             | Update read-only variable and restart the server |
| gtid_mode                              | OFF           | ON             | Update read-only variable and restart the server |
| slave_parallel_type                    | DATABASE      | LOGICAL_CLOCK  | Update the server variable                       |
| slave_preserve_commit_order            | OFF           | ON             | Update the server variable                       |
+----------------------------------------+---------------+----------------+--------------------------------------------------+

Some variables need to be changed, but cannot be done dynamically on the server.
Do you want to perform the required configuration changes? [y/n]: y
Do you want to restart the instance after configuring it? [y/n]: y

Cluster admin user 'clusteradm'@'%' created.
Configuring instance...
The instance 'ic-server1:3306' was configured to be used in an InnoDB cluster.
Restarting MySQL...
NOTE: MySQL server at ic-server1:3306 was restarted.
 JS > \sql
Switching to SQL mode... Commands end with ;
 MySQL  SQL > \connect root@localhost:3306
Creating a session to 'root@localhost:3306'
Please provide the password for 'root@localhost:3306': ****
Save password for 'root@localhost:3306'? [Y]es/[N]o/Ne[v]er (default No): N
Fetching schema names for autocompletion... Press ^C to stop.
Your MySQL connection id is 8
Server version: 8.0.23 MySQL Community Server - GPL
No default schema selected; type \use <schema> to set one.
 MySQL  localhost:3306 ssl  SQL > show variables like '%enforce_gtid_consistency%';
+--------------------------+-------+
| Variable_name            | Value |
+--------------------------+-------+
| enforce_gtid_consistency | ON    | <-- 시스템 변수 적용됨
+--------------------------+-------+
위에서 진행된 내역에 대해서 살펴보도록 하겠습니다.
1) ERROR: User 'root' can only connect from 'localhost'.
메서드에서 사용된 계정인 root 계정의 localhost 대역대로만 접속 가능하기 때문에 다른 서버에서도 접속이 가능한 % 대역대의 계정 생성을 권장하는 내용입니다.
이에 해결 방법으로는 첫번째 root 유저에 대해서 % 대역대로 생성이며, 두번째는 % 호스트인 InnoDB Cluster 를 위한 최소한의 권한을 부여받은 새로운 계정을 생성입니다.
포스팅에서는 2번을 선택하여 clusteradm 이라는 새로운 계정 생성을 진행하였습니다.
Please select an option [1]: 2
Account Name: clusteradm
Password for new account: **********
Confirm password: **********
2번을 선택하여 별도로 계정 생성하였다면 아래와 같이 권한을 추가로 부여합니다.
mysql> GRANT CONNECTION_ADMIN,
GROUP_REPLICATION_ADMIN,
REPLICATION_SLAVE_ADMIN,
ROLE_ADMIN ON *.* TO 'clusteradm'@'%' WITH GRANT OPTION;
2) NOTE: Some configuration options need to be fixed
InnoDB 클러스터를 구성하기 위해서 필요한 시스템 변수 설정이 필요하다고 하는 내용의 부분으로 y 를 선택하여 설정을 하게 되면 SET PERSIST 로 파라미터를 적용하게 됩니다.
SET PERSIST 로 설정하면 JSON 형태로 MySQL 서버가 파라미터 파일을 관리하게 됩니다.(like Oracle's SPFILE)
파일은 datadir 에 mysqld-auto.cnf 파일에 기록됩니다.
# cat mysqld-auto.cnf | jq
{
  "Version": 1,
  "mysql_server": {
    "binlog_transaction_dependency_tracking": {
      "Value": "WRITESET",
      "Metadata": {
        "Timestamp": 1662821603177355,
        "User": "root",
        "Host": "localhost"
      }
    },
    "mysql_server_static_options": {
      "enforce_gtid_consistency": {
        "Value": "ON",
        "Metadata": {
          "Timestamp": 1662821603178052,
          "User": "root",
          "Host": "localhost"
        }
      },
      "gtid_mode": {
        "Value": "ON",
        "Metadata": {
          "Timestamp": 1662821603180023,
          "User": "root",
          "Host": "localhost"
        }
      },
      "slave_parallel_type": {
        "Value": "LOGICAL_CLOCK",
        "Metadata": {
          "Timestamp": 1662821603180607,
          "User": "root",
          "Host": "localhost"
        }
      },
      "slave_parallel_workers": {
        "Value": "4",
        "Metadata": {
          "Timestamp": 1662821603176761,
          "User": "root",
          "Host": "localhost"
        }
      },
      "slave_preserve_commit_order": {
        "Value": "ON",
        "Metadata": {
          "Timestamp": 1662821603180812,
          "User": "root",
          "Host": "localhost"
        }
      }
    }
  }
}
관련한 자세한 내용은 이전 포스팅을 참조하시면 됩니다.

위의 과정을 나머지 다른 서버에서도 동일하게 진행합니다.
클러스터 생성
모든 서버에서 준비가 모두 완료되었다면 dba.createCluster() AdminAPI를 사용하여 클러스터를 생성하고 MySQL Shell이 연결된 인스턴스를 클러스터의 시드 인스턴스로 사용합니다.
시드 인스턴스는 클러스터에 추가하는 다른 인스턴스에 복제되어 시드 인스턴스의 복제본이 됩니다.
포스팅 예제에서는 호스트명 "ic-server1" 인스턴스가 시드로 사용되게 됩니다.
mysql shell 로 접속합니다.
user$ mysqlsh
MySQL Shell 8.0.23

Copyright (c) 2016, 2021, Oracle and/or its affiliates.
Oracle is a registered trademark of Oracle Corporation and/or its affiliates.
Other names may be trademarks of their respective owners.

Type '\help' or '\?' for help; '\quit' to exit.
 MySQL  JS >
InnoDB 클러스터용으로(clusteradm) 생성한 유저를 이용해서 ic-server1 로 접속합니다.
 JS > \connect clusteradm@ic-server1:3306
Creating a session to 'clusteradm@ic-server1:3306'
Please provide the password for 'clusteradm@ic-server1:3306': **********
Save password for 'clusteradm@ic-server1:3306'? [Y]es/[N]o/Ne[v]er (default No): N
Fetching schema names for autocompletion... Press ^C to stop.
Your MySQL connection id is 10
Server version: 8.0.23 MySQL Community Server - GPL
No default schema selected; type \use <schema> to set one.
 MySQL  ic-server1:3306 ssl  JS >
dba.createCluster() 명령어를 이용해서 클러스터 생성을 진행하면 되며, 포스팅에서는 클러스터 이름을 "JadeCluster" 라고 생성하였습니다. (클러스터명은 예시임)
 JS > var cluster = dba.createCluster('JadeCluster')
A new InnoDB cluster will be created on instance 'ic-server1:3306'.

Validating instance configuration at ic-server1:3306...

This instance reports its own address as ic-server1:3306

Instance configuration is suitable.
NOTE: Group Replication will communicate with other members using 'ic-server1:33061'. Use the localAddress option to override.

Creating InnoDB cluster 'JadeCluster' on 'ic-server1:3306'...

Adding Seed Instance...
Cluster successfully created. Use Cluster.addInstance() to add MySQL instances.
At least 3 instances are needed for the cluster to be able to withstand up to
one server failure.
반환된 클러스터를 변수에 할당하는 이 패턴을 사용하면 Cluster 개체의 메서드를 사용하여 클러스터에 대해 추가 작업을 실행할 수 있습니다.
MySQL Shell 의 dba.createCluster() 명령어를 통해서 InnoDB 클러스터 생성이 완료되었습니다.
단계나 방법은 간단하였지만 실제로 그룹 복제를 별도로(수동으로) 설정을 한다면 이 보다 더 복잡하고 어려운 구성을 직접 진행해야 합니다. 여러 복잡한 단계나 절차에 대해서 dba.createCluster() 명령어를 통해서 자동으로 처리를 해주게 된 것입니다.
[참고] 클러스터를 관리하기 위해 필요한 적절한 권한을 가진 적합한 사용자(user) 가 없는 경우에(이전 단계에서 별도로 생성하지 않았다면) 권장되는 접근 방식은 별도의 관리 사용자를 만드는 것입니다. 이전 단계 인스턴스를 구성하는 단계에서 생성하지 않은 경우 아래와 같이 cluster.setupAdminAccount() 명령어를 통해서 생성할 수 있습니다.
아래 예시에서는 icadmin 이라는 이름으로 생성하는 내용입니다.
mysql-js> cluster.setupAdminAccount("icadmin")
InnoDB Cluster의 기본 구성은 Single-Primary 모드입니다. Multi-Primary 모드로 생성하기를 원한다면 아래와 같이 진행할 수 있습니다.
JS > var cluster = dba.createCluster('JadeCluster',{multiPrimary:true})
클러스터에 멤버 추가
지금 상태는 3개 서버 중에서 1개 서버만으로 클러스터가 구성된 상태임으로 나머지 2개 서버(인스턴스)를 클러스터에 추가하도록 하겠습니다.
클러스터에 인스턴스 추가는 cluster.addInstance() 명령어를 사용해서 진행하면 되며 MySQL Shell 이 설치된 클러스터내 모든 서버에서 진행 가능하며(꼭 해당 서버에서만 해야 하는 것은 아님) 꼭 Primary 해야 하는 것도 아닙니다.
클러스터에 추가 시 바로 추가할 것인지 기존 서버 와 데이터 동기화가 필요한지를 판단하게 되며 데이터 동기화가 필요 하다 라고 판단된다면 Group Replication 에서의 분산 복구를 수행하게 되며, 방식에 대해서는 사용자가 선택하게 됩니다.
기본적으로 사용되는 방식은 원격 클론 방법이며, 다른 방법으로는 바이너리 로그 복제 방식으로 복구 방식을 선택할 수 있습니다.
트랜잭션을 복구하기 위해 비동기식 복제에 의존하는 대신 MySQL Clone은 기증자 인스턴스에서 데이터의 스냅샷을 찍은 다음 스냅샷을 수신자에게 전송합니다.
클러스터에 인스턴스 추가는 다음과 같이 진행합니다.
 JS > var cluster = dba.getCluster()
 JS > cluster.addInstance('clusteradm@ic-server2:3306')

NOTE: The target instance 'ic-server2:3306' has not been pre-provisioned (GTID set is empty). The Shell is unable to decide whether incremental state recovery can correctly provision it.
The safest and most convenient way to provision a new instance is through automatic clone provisioning, which will completely overwrite the state of 'ic-server2:3306' with a physical snapshot from an existing cluster member. To use this method by default, set the 'recoveryMethod' option to 'clone'.

The incremental state recovery may be safely used if you are sure all updates ever executed in the cluster were done with GTIDs enabled, there are no purged transactions and the new instance contains the same GTID set as the cluster or a subset of it. To use this method by default, set the 'recoveryMethod' option to 'incremental'.

Please select a recovery method [C]lone/ncremental recovery/[A]bort (default Clone): C
Validating instance configuration at ic-server2:3306...

This instance reports its own address as ic-server2:3306

Instance configuration is suitable.
NOTE: Group Replication will communicate with other members using 'ic-server2:33061'. Use the localAddress option to override.

A new instance will be added to the InnoDB cluster. Depending on the amount of
data on the cluster this might take from a few seconds to several hours.

Adding instance to the cluster...

Monitoring recovery process of the new cluster member. Press ^C to stop monitoring and let it continue in background.
Clone based state recovery is now in progress.

NOTE: A server restart is expected to happen as part of the clone process. If the
server does not support the RESTART command or does not come back after a
while, you may need to manually start it back.

* Waiting for clone to finish...
NOTE: ic-server2:3306 is being cloned from ic-server1:3306
** Stage DROP DATA: Completed
** Clone Transfer
    FILE COPY  ============================================================    0%  In Progress
    PAGE COPY  ============================================================    0%  Not Started
    REDO COPY  ============================================================    0%  Not Started

NOTE: ic-server2:3306 is shutting down...

* Waiting for server restart... ready
* ic-server2:3306 has restarted, waiting for clone to finish...
** Stage RESTART: Completed
* Clone process has finished: 164.50 MB transferred in about 1 second (~164.50 MB/s)

State recovery already finished for 'ic-server2:3306'

The instance 'ic-server2:3306' was successfully added to the cluster.
초기 데이터 동기화 방식을 Clone 방식을 선택하여 진행하였습니다.
Please select a recovery method [C]lone/ncremental recovery/[A]bort (default Clone): C
"ic-server2:3306 was sucessfully added to cluster" 메세지에서 확인할 수 있는 것처럼 정상적으로 추가가 되었습니다.
초기 데이터 동기화의 필요성에 대해서는 처음 클러스터를 구성한 시드 인스턴스에 생성된 클러스터에 관한 정보인 클러스터 메타데이터에 대해서 이 정보를 동기화 하기 위해서 추가된 서버로 복구 과정을 진행한 것입니다.
나머지 서버에 대해서도 동일하게 진행하여 클러스터 추가를 완료하도록 합니다.
JS > var cluster = dba.getCluster()
JS > cluster.addInstance('clusteradm@ic-server3:3306')
[참고] 방화벽 정책
설치한 OS나 설치한 방식 등에 따라서 OS 방화벽이 활성화가 되었을 수 있습니다. 이 경우 인스턴스 별로 통신이 불가하여 클러스터에 신규 인스턴스의 추가가 불가능 하게 됩니다. 아래는 CentOS/Oracle Linux/Rocky Linux 에서 사용되는 firewalld 에서 포트를 허용하는 내용으로 3개(TCP/3306, TCP/33060 , TCP/33061)의 포트를 오픈 하였습니다.
sudo firewall-cmd --permanent --add-port=3306/tcp
sudo firewall-cmd --permanent --add-port=33060/tcp
sudo firewall-cmd --permanent --add-port=33061/tcp

sudo firewall-cmd --reload
sudo firewall-cmd --list-all
MySQL 포트에 대한 자세한 내용은 아래 문서를 참조하시면 됩니다.
클러스터 상태 확인
3개 인스턴스 모두 클러스터로 구성이 완료되었습니다. 이제 클러스터 상태를 확인해보도록 하겠습니다.
 JS > var cluster = dba.getCluster()
 JS > cluster.status()
{
    "clusterName": "JadeCluster",
    "defaultReplicaSet": {
        "name": "default",
        "primary": "ic-server1:3306",
        "ssl": "REQUIRED",
        "status": "OK",
        "statusText": "Cluster is ONLINE and can tolerate up to ONE failure.",
        "topology": {
            "ic-server1:3306": {
                "address": "ic-server1:3306",
                "mode": "R/W",
                "readReplicas": {},
                "replicationLag": null,
                "role": "HA",
                "status": "ONLINE",
                "version": "8.0.23"
            },
            "ic-server2:3306": {
                "address": "ic-server2:3306",
                "mode": "R/O",
                "readReplicas": {},
                "replicationLag": null,
                "role": "HA",
                "status": "ONLINE",
                "version": "8.0.23"
            },
            "ic-server3:3306": {
                "address": "ic-server3:3306",
                "mode": "R/O",
                "readReplicas": {},
                "replicationLag": null,
                "role": "HA",
                "status": "ONLINE",
                "version": "8.0.23"
            }
        },
        "topologyMode": "Single-Primary"
    },
    "groupInformationSourceMember": "ic-server1:3306"
}
현재 구성된 클러스터는 Single-Primary Mode 로 구성 되어있으며 처음 구성한 인스턴스 ic-server1 이 RW가 가능한 Primary 로 되어 있으며, 그 다음 추가한 ic-server2 , ic-server3 는 R/O 모드인 Secondary(Replica) 로 동작하는 것을 알 수 있습니다.
defaultReplicaSet 의 status 의 값도 "OK" 로 되어 있으므로 구성에 문제가 없는(최소 정족수 3개) 상태임을 알 수 있습니다.
처음 클러스터 구성하여 1개의 인스턴스만 존재하였을 경우 status 는 "OK_NO_TOLERANCE" 이었습니다.
이번 포스팅은 여기서 마무리하며 아래 다음 포스팅에서 MySQL Router 구성 및 접속에 대해서 확인해보도록 하겠습니다.
Reference
Reference URL
• mysql.com/mysql-router
• mysql.com/mysql-shell
• mysql.com/innodb-cluster
• mysql.com/innodb-cluster-setting
• myql.com/innodb-cluster-requirements
• mysql.com/mysql-port
연관된 다른 글

Principal DBA(MySQL, AWS Aurora, Oracle)
핀테크 서비스인 핀다에서 데이터베이스를 운영하고 있어요(at finda.co.kr)
Previous - 당근마켓, 위메프, Oracle Korea ACS / Fedora Kor UserGroup 운영중
Database 외에도 NoSQL , Linux , Python, Cloud, Http/PHP CGI 등에도 관심이 있습니다
purityboy83@gmail.com / admin@hoing.io


MySQL SQL > dba.checkInstanceConfiguration(myadmin@192.168.50.3:3306);
ERROR: Not connected.
이렇게 나오는데 뭐가 문제일까요?
shell 설치 해서 구성중입니다.
복제 구성을 미리 해놓은 상태에서 설정해야 하나요?
MySQL mysql801:3306 ssl SQL
여기 프롬프트에서 하는거 맞나요?
ERROR: Not connected.
뭘해도 이렇게 나오는데 뭔가 잘못된거죠?
여러 댓글에 대해서 한번에 회신을 드립니다.
글의 흐름과 동일하게 MySQL 서버를 모두 설치후에 클러스터 구성입니다.
최소 3대의 MySQL이 필요하기 때문에 3개의 서버에 각각 MySQL 설치 및 시작하시면 됩니다.
그 다음에 MySQL Shell 을 통해서 Cluster 를 구성하는 순서로 진행됩니다.
클러스터를 구성 후에 MySQL Router를 연결합니다.