


Last Updated on 8월 31, 2023 by Jade(정현호)
안녕하세요
이번 포스팅에서는 MySQL 에서의 접속 과 복제 시 SSL 기능을 사용하는 내용에 대해서 확인해보도록 하겠습니다.
Contents
SSL(Secure Sockets Layer)
보통 Client 와 Server의 통신은 기본적으로 일반적인 통신, 즉 평문으로 서로 간의 통신을 하게 됩니다.
요즘의 IT환경은 보안적으로 여러 위험이 대두되고 있고 보안을 중요하게 생각을 하고 그에 따라 웹 사이트의 경우 SSL 을 사용한 HTTPS 로 구성/운영 하는 사이트를 이전보다는 이제 손쉽게 많이 볼 수 있습니다.
SSL에 대해서 간단하게 언급을 한다면 1994년 Netscape 사에 의해 개발된 보안 기술로써 Secure Sockets Layer 의 약자이고 현재는 표준적인 보안 기술로 사용되고 있으며 SSL 사용시 Sniffing 과 phishing 를 방지할 수 있습니다.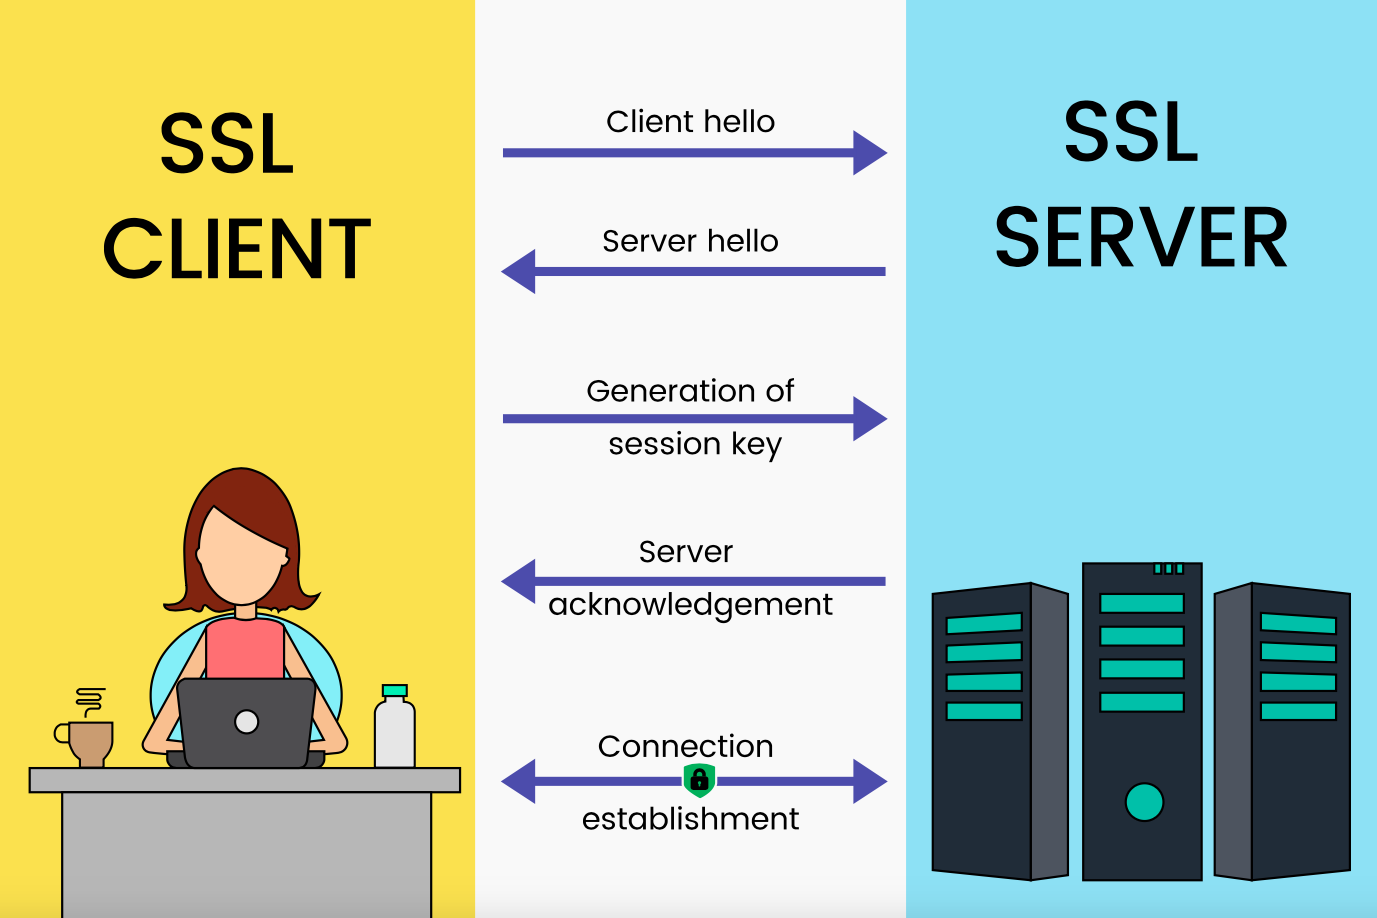
manageengine.com/what-is-ssl [L]
우리나라의 몇 가지 정보통신망 또는 개인정보 보호 관련 법적 내용에서 개인정보 및 인증정보의 송수신할 때는 보안서버(SSL/HTTPS) 를 구축해서 사용 해야함이 명시도 되어있기도 합니다
그 만큼 우리가 알게 모르게 웹 사이트를 이용하면서 SSL을 지금도 이용중이며 SSL 미사용 사이트라도 로그인 할 때나 결제 페이지에서는 HTTPS 로 전환되는 모습도 종종 볼 수 가 있기도 합니다.
MySQL 과 같은 DB는 외부에서 직접 접속을 하는 형태보다는 내부에서 Backend 형태로 다른 API 나 WAS 와 같은 Backend 시스템과의 통신하는 것이 보통이지만, 접속하는 클라이언트(웹, WAS, PC 등) 간의 통신에서 오고 가는 데이터가 평문으로 전송시에 스니핑 공격에 의해서 전송 패킷 내용이 확인될 수도 있는 부분이 있기 때문에 가능한 환경이라고 한다면 지금같이 SSL 사용이 보편적인 부분에 맞춰서 MySQL 에서 SSL을 사용하는 것도 고려해볼 수 있을 것 같습니다.
MySQL 버전 별 SSL 라이브러리
MySQL 의 버전 ,Edition, 빌드 타입에 따라서 사용되는 라이브러리가 달라지게 됩니다.
Source Compile
Source 를 통한 설치시에는 버전별로 SSL의 필수여부가 달라지게 됩니다.
MySQL 5.6
• MySQL 5.5 버전 부터 Source Compile CMAKE 를 사용하게 되며 SSL의 옵션은 -DWITH_SSL 에서 지정하게 되며 선택할 수 있는 값은 아래와 같습니다.
no | yes | bundled | system | path_name
• MySQL 5.6.5 까지는 CMAKE의 -DWITH_SSL 의 DEFAULT가 NO 였으며, SSL 사용시 bundled 이나 system 등을 선택하여 사용할 수 있었습니다.
• MySQL 5.6.6 부터 5.6.45 까지 -DWITH_SSL의 Default value는 bundled 로 변경되었으며, NO 는 허용되지 않습니다.
즉 5.6.6 버전 부터는 MySQL 엔진은 SSL을 포함하여 빌드가 되어야 한다는 것 의미하며, 엔진(S/W)에서 SSL 기본 탑재되었다는 것을 의미합니다.
• bundled 를 선택 시 사용되는 라이브러리는 yaSSL 입니다
wikipedia 에 따르면 yaSSL 은 MySQL 의 bundle 로 많이 사용된 라이브러리 인 것을 알 수 있습니다.
wolfSSL/CyaSSL/yaSSL의 첫 시작은 MySQL에서 이용되었다. 이 결과, yaSSL은 MySQL과의 번들링을 통해 수백만 단위의 매우 높은 보급을 실현했다. -wikipedia
• MySQL 5.6.46 버전은 부터는 default 가 system 으로 변경되었습니다.
system은 OS의 OpenSSL 을 사용하는 것을 의미합니다.
• path_name 는 OS에 설치된 OpenSSL 의 경로를 찾지 못할 때 , 또는 별도로 Source Compile 로 설치한 OpenSSL 을 사용을 할 때, 이럴 때 경로를 지정해서 사용합니다.
MySQL 5.7
먼저 MySQL 5.7 에서의 CMAKE 의 -DWITH_SSL 에서 NO 는 없습니다 즉 5.7 버전은 SSL 라이브러리를 포함해서 빌드가 되어야 한다는 것을 의미합니다.
• MySQL 5.7.0~5.7.27 까지는 -DWITH_SSL 의 Default Value는 bundled 이었습니다.
• MySQL 5.7.28 부터 -DWITH_SSL 의 Default Value 가 system 으로 변경되었으며 bundled 는 허용되지 않습니다 즉 system 만 사용 가능하며 컴파일 설치시 OpenSSL 이 준비가 되어있어야 함을 의미합니다.
MySQL 8
MySQL 8 버전은 위와 같은 버전 별 내용은 별도로 확인되지 않지만 mysqlserverteam 사이트에서 MySQL Enterprise Edition 및 MySQL Community Edition 모두에 대한 기본 TLS/SSL 라이브러리로 OpenSSL을 통합한다는 내용이 있습니다.
이와 같은 내용으로 확인하였을 때 -DWITH_SSL Value 는 8.0.0~8.0.3 까지는 bundled(yaSSL) 과 system(OpenSSL) 선택이 가능하였다가 8.0.4 부터 system 만 가능한 것으로 파악됩니다
document 에는 ssl_type 에 system 만 기재되어 있긴 합니다.
Binary Distributions
이미 빌드(컴파일)가 되어서 배포되는 Binary Distribution 으로는 리눅스 기준으로 RPM(YUM/DNF) 또는 Linux Generic Binary 2가지 형태로 다운로드 받아서 설치할 수 있습니다.
바이너리 빌드 버전의 경우 아래와 같이 SSL 라이브러리를 포함하여 빌드(컴파일) 후 배포가 된 것으로 확인됩니다.
• MySQL 5.6 과 5.7 공통
MySQL Enterprise Edition binary distributions are compiled using OpenSSL.
It is not possible to use yaSSL with MySQL Enterprise Edition.
MySQL Community Edition binary distributions are compiled using yaSSL.
상용(유료) 버전인 Enterprise Edition 의 경우 OpenSSL 을 통해서 컴파일 되었으며, Community Edition 는 5.6,5.7 버전은 모두 대부분의 마이너 버전에서는 yaSSL 을 통해 컴파일 되어 배포되었으며, 특정 버전부터는 OpenSSL 로 컴파일 되는 것으로 빌드가 변경되었습니다.
MySQL 5.6 은 5.6.46 버전, MySQL 5.7은 5.7.28 부터 바이너리 설치파일이 OpenSSL 로 컴파일 되어 배포됩니다.
• MySQL 8.0
8 버전의 경우 8.0 또는 8.0.4 버전 부터 Enterprise Edition 과 Community Edition 모두 OpenSSL 로 통합된 것으로 확인됩니다.
MySQL 에서 SSL 인증서
MySQL 에서 인증서를 생성하는 방법은 MySQL 의 버전에 따라 방법이 약간은 다르게 됩니다.
MySQL 5.5, 5.6 버전의 경우 OpenSSL 을 통해서 별도로 생성이 필요 합니다.
5.7 버전 부터는 관련된 파라미터 추가 및 이전보다 더 손쉽게 별도의 인증서를 만드는 툴이 제공되는 등 편의적인 부분에 대해서 개선이 되었습니다.
MySQL 5.7 대상으로 설명을 하도록 하겠습니다.
[참고] SSL/TLS에 대한 내용과 MySQL접속 시 SSL/TLS로 접속 과정에서 TLS 버전 관련하여 SSL Handshake 이슈 중심으로 핀다 기술 블로그에 글을 작성하였습니다.

인증서 생성
인증서 생성은 5.7 버전에서 MySQL 이 시작되는 시점에 자동적으로 생성되게 되게 되며, 또는 mysqld --initialize 를 통해서 Database 를 생성하는 과정에서도 생성되게 됩니다.
RPM이나 DEB 와 같은 패키지 시스템(yum,apt 포함) 설치시에는 data directory 에 대한 initialization 진행 시 mysql_ssl_rsa_setup 를 수행하여 생성하게 됩니다.
위와 같이 자동적으로 생성되는 것 이외 수동으로 별도로 생성하고자 할 때는 이전과 같이 OpenSSL 을 사용하거나 추가된 mysql_ssl_rsa_setup 를 통해서 생성할 수 있습니다.
위에서 설명 한것 처럼 Startup시 누락된 SSL 과 RSA 인증서를 자동으로 생성이 되며 이와 관련된 파라미터로 auto_generate_certs 와 sha256_password_auto_generate_rsa_keys 파라미터가 있습니다. 두 파라미터 모두 Default ON(Enable) 입니다.
2개의 파라미터의 Enable 에 따라서 Startup시 SSL이나 RSA 인증서가 없다면 생성이 되게 됩니다.
특정 마이너 버전에서는 문서의 내용과 다르게 DB 시작 시 생성이 안되는 경우가 있을 수 있으며 생성이 안된다면 mysql_ssl_rsa_setup 를 통해서 생성을 진행하면 됩니다.
~]# ./mysql_ssl_rsa_setup --uid=mysql
--uid 옵션을 통해서 인증서 생성시 유저를 지정할 수 있습니다.
생성되는 인증서 파일
인증서 파일은 data directory에 생성되며 각 항목별로 아래와 같은 파일이 생성되게 됩니다.
• data directory for SSL file
관련 파라미터 : auto_generate_certs
파일 :
ca.pem - Self-signed CA certificate
ca-key.pem - CA private key
server-cert.pem - Server certificate
server-key.pem - Server private key
client-cert.pem - Client certificate
client-key.pem - Client private key
• data directory for RSA files
관련 파라미터 : sha256_password_auto_generate_rsa_keys
파일 :
private_key.pem - Private member of private/public key pair
public_key.pem - Public member of private/public key pair
5.7 버전에서 DB 초기화 이후에 인증서 관련 파일을 보면 아래와 같이 생성되어 있습니다.
~]# ls -al | grep pem
-rw------- 1 mysql mysql     1680 Jul 23 01:48 ca-key.pem
-rw-r--r-- 1 mysql mysql     1112 Jul 23 01:48 ca.pem
-rw-r--r-- 1 mysql mysql     1112 Jul 23 01:48 client-cert.pem
-rw------- 1 mysql mysql     1676 Jul 23 01:48 client-key.pem
-rw------- 1 mysql mysql     1676 Jul 23 01:48 private_key.pem
-rw-r--r-- 1 mysql mysql      452 Jul 23 01:48 public_key.pem
-rw-r--r-- 1 mysql mysql     1112 Jul 23 01:48 server-cert.pem
-rw------- 1 mysql mysql     1676 Jul 23 01:48 server-key.pem
SSL and RSA File Characteristics
자동으로 생성되거나 mysql_ssl_rsa_setup을 호출하여 생성된 SSL 및 RSA 파일에는 다음과 같은 특성이 있습니다
• SSL and RSA keys 사이즈는 2048 bits 입니다.
• The SSL CA certificate(인증서)는 자체 서명입니다.
• sha256WithRSAEncryption signature 알고리즘을 사용하여 서버와 클라이언트 간의 CA인증서 및 키로 서명됩니다.
• SSL 인증서 이름은 아래와 같은 규칙으로 생성됩니다.
ca.pem
 MySQL_Server_suffix_Auto_Generated_CA_Certificate

server-cert.pem
 MySQL_Server_suffix_Auto_Generated_Server_Certificate

client-cert.pem
 MySQL_Server_suffix_Auto_Generated_Client_Certificate
suffix 는 MySQL의 버전 번호입니다
5.7.34 버전의 인증서 이름 예시
 MySQL_Server_5.7.34_Auto_Generated_CA_Certificate
참고로 인증서 파일의 상세 내역은 openssl x509 -text -in 파일명을 통해 확인이 가능 합니다.
• SSL 파일에는 국가(C), 시/도(ST), 조직(O), 조직 단위 이름(OU) 및 이메일 주소에 대한 값은 비어 있습니다.
• 서버 또는 mysql_ssl_rsa_setup에 의해 생성된 SSL 파일은 생성 시점으로부터 10년 동안 유효합니다. 즉 생성된 인증서는 10년동안 사용 가능 합니다.
조회 예시) 2021년 부터 2031년까지
Validity
Not Before: Jul 22 16:48:59 2021 GMT
Not After : Jul 20 16:48:59 2031 GMT
• RSA 파일은 만료되지 않습니다.
• SSL 파일은 각 인증서/키 쌍에 대해 서로 다른 일련 번호를 갖습니다 (CA용 1, 서버용 2, 클라이언트용 3)
• 자동적으로 생성될 경우 MySQL 실행 유저로 파일이 생성이 되며, mysql_ssl_rsa_setup 를 실행하여 생성할 경우 mysql_ssl_rsa_setup 를 실행한 유저로 생성됩니다.
가령 mysql_ssl_rsa_setup 실행을 root 로 하였다면 root 유저로 생성이 되게 됩니다.
root 유저로 실행하면서 파일의 소유자(ownership)을 지정할 경우 --uid 옵션을 사용해야 합니다.
MySQL SSL Variables
SSL 접속에 관련된 파라미터는 여러가지가 있으며 아래와 같은 기능과 내용을 포함하고 있습니다.
• have_ssl
SSL 접속 기능의 사용 유무를 결정하는 파라미터입니다.
동일 파라미터로 have_openssl 가 있으며 have_openssl 는 have_ssl 의 synonym 입니다.
• 인증서 파일 관련
ssl_ca : ca.pem
ssl_cert : server-cert.pem
ssl_key : server-key.pem
• ssl_cipher
연결 암호화에 허용되는 암호 목록입니다. 목록에 지원되는 암호가 없으면 암호화된 연결이 작동하지 않습니다.
Cipher suite 는 TLS 핸드쉐이크를 하는 과정에서 어떤 프로토콜을 사용할지를 어떤 암호화하여 통신할지 등에 대한 정보입니다.
ssl_cipher 변수에 특정 cipher 를 설정하면 지정한 Cipher suite 로만 사용할 수 합니다.
설정시 지원 목록에 암호가 없으면 암호화된 연결이 작동하지 않게 됩니다. 기본값을 제한이 없는 NULL입니다.
OpenSSL 사용시 아래 문서에서 확인할 수 있는 내용대로 암호 지정에 대한 유연한 구문을 지원합니다
yaSSL은 그렇지 않으므로 yaSSL을 사용하여 컴파일 된 MySQL 배포판에 대해 확장 구문을 사용하려는 시도는 실패합니다
CIPHER SUITE NAMES 항목에서 버전별로 확인할 수 있습니다.
• tls_version
서버가 암호화된 연결을 허용하는 프로토콜 리스트입니다.
하나 이상의 프로토콜 버전을 사용할 수 있으며, 콤마(,) 로 구문하여 입력하면 됩니다.
사용할 수 있는 프로토콜은 MySQL이 컴파일 될 때 사용되는 라이브러리 종류에 따라 달라지게 됩니다.
또한 사용하는 OpenSSL 버전에 따라서도 달라지게 됩니다.
참고로 yaSSL 은 TLSv1.1 까지만 지원됩니다.
위에서 일부 설명된 내용처럼 MySQL 5.6 과 5.7에서 SSL 라이브러리를 변경함에 따라서 버전에 따라서 TLS 버전 지원이 다르게 됩니다.
When compiled using yaSSL, MySQL supports the TLSv1 and TLSv1.1 protocols.
• 5.6 버전 : TLSv1 을 지원하였으며, MySQL 5.6.46 부터는 TLSv1.1 과 TLS v1.2 를 지원합니다.
즉 해당 버전 부터 OpenSSL 으로 변경되었음을 알 수 있으며 Source Compile 의 CMAKE 의 -DWITH_SSL 기본값도 bundled 에서 system 으로 변경됩니다.
MySQL 5.6.23 버전에서는 SSL 2.0 과 SSL 3.0 이 비활성화 되었습니다.
• 5.7 버전 : 5.7.28 버전부터 Source Compile 의 -DWITH_SSL 기본값이 system 으로 변경되었으며 bundled 는 허용되지 않는 value 로 변경되었으며 tls_version 파라미터도 해당 버전의 기준으로 변경되게 됩니다.
tls_version
Default Value (≥ 5.7.28) : TLSv1,TLSv1.1,TLSv1.2
Default Value (≤ 5.7.27) :
TLSv1,TLSv1.1,TLSv1.2 (OpenSSL)
TLSv1,TLSv1.1 (yaSSL)
그래서 바이너리(tarball 또는 RPM/DEB) 버전의 설치 엔진의 경우 5.7.27 까지는 TLSv1.1 버전 까지만 접속이 가능하고 상위 버전인 TLSv1.2 는 접속이 되지 않습니다.
~]$ mysql -uroot -proot123 -h 서버IP주소 -P 3327
mysql: [Warning] Using a password on the command line interface can be insecure.
Welcome to the MySQL monitor.  Commands end with ; or \g.
Your MySQL connection id is 8
Server version: 5.7.27-log MySQL Community Server (GPL) <---- 5.7.27 버전 -----

Copyright (c) 2000, 2019, Oracle and/or its affiliates. All rights reserved.

Oracle is a registered trademark of Oracle Corporation and/or its
affiliates. Other names may be trademarks of their respective
owners.

Type 'help;' or '\h' for help. Type '\c' to clear the current input statement.

mysql> SELECT * FROM performance_schema.session_status
       WHERE VARIABLE_NAME IN ('Ssl_version','Ssl_cipher');
+---------------+--------------------+
| VARIABLE_NAME | VARIABLE_VALUE     |
+---------------+--------------------+
| Ssl_cipher    | DHE-RSA-AES256-SHA |
| Ssl_version   | TLSv1.1            | <-- 1.1로 접속됨
+---------------+--------------------+
2 rows in set (0.00 sec)

mysql> exit


-- TLSv1.2 로 접속 시도, 접속 불가
~]$ mysql -uroot -proot123 -h 서버IP주소 -P 3327 --tls-version=TLSv1.2
mysql: [Warning] Using a password on the command line interface can be insecure.
ERROR 2026 (HY000): SSL connection error: error:14077102:SSL routines:SSL23_GET_SERVER_HELLO:unsupported protocol
MySQL 과 접속 후 아래 쿼리를 통해 SSL 접속여부 및 접속에 사용된 cipher 와 tls버전을 확인할 수 있습니다.
SELECT *
FROM performance_schema.session_status
WHERE VARIABLE_NAME IN (
  'Ssl_version',
  'Ssl_cipher'
);
MySQL 5.7.35 버전부터 TLSv1 and TLSv1.1 protocols 에 대해서 deprecated 가 되었습니다. TLSv1.2 를 이용하거나 OpenSSL 1.1.1 을 통해서 TLSv1.3 을 사용해야 합니다.
• 8 버전: 8.0.16 버전부터 변경사항이 있으며 8.0.16 버전 부터 TLSv1.3 을 지원하기 시작하였으며 Source Compile 시 OpenSSL 1.1.1 이상 버전이 필요 합니다.
tls_version
Default Value (≥ 8.0.16) :
TLSv1,TLSv1.1,TLSv1.2,TLSv1.3 (OpenSSL 1.1.1 and higher)
TLSv1,TLSv1.1,TLSv1.2 (otherwise)
Default Value (≤ 5.7.27) :
TLSv1,TLSv1.1,TLSv1.2
• 8.0.26,8.0.28 버전에서 변경 사항
해당 버전에서 TLS 지원 버전 변경이 되었습니다.
자세한 내용은 아래 포스팅을 참조하시면 됩니다.

Java 8u291 와 MySQL의 TLS
Java 릴리즈 노트에 따르면 Java 8 버전의 Update 291 버전 부터는 TSLv1.0 과 TLSv1.1 이 더이상 지원을 하지 않는 비활성화 상태로 변경이 되었습니다.
TLS 1.0 and 1.1 are versions of the TLS protocol that are no longer considered secure and have been superseded by more secure and modern versions (TLS 1.2 and 1.3)
These versions have now been disabled by default. If you encounter issues, you can, at your own risk, re-enable the versions by removing "TLSv1" and/or "TLSv1.1" from the jdk.tls.disabledAlgorithms security property in the java.security configuration file.
그에 따라서 MySQL 바이너리 설치 버전(RPM/DEB or Tarball) 중 5.7.27 이하 버전을 사용할 경우 yaSSL 로 컴파일 빌드 됨에 따라서 TLSv1.1 까지만 지원되어, 자바를 8u291 로 업데이트시 아래와 같이 SSLHandshakeException 에러가 발생되면서 갑자기 접속이 안되게 됩니다.
5.7 버전 이하의 5.6 이나 5.5 버전에서 TLSv1 또는 TLSv1.1 을 사용하던 MySQL서버도 역시 접속이 불가능 하게 됩니다.
에러 로그
The last packet sent successfully to the server was 0 milliseconds ago. The driver has not received any packets from the server.
        at sun.reflect.NativeConstructorAccessorImpl.newInstance0(Native Method)
        <... 중략 ...>
Caused by: javax.net.ssl.SSLHandshakeException: No appropriate protocol (protocol is disabled or cipher suites are inappropriate)
        at sun.security.ssl.HandshakeContext.<init>(HandshakeContext.java:171)
        at sun.security.ssl.ClientHandshakeContext.<init>(ClientHandshakeContext.java:98)
        at sun.security.ssl.TransportContext.kickstart(TransportContext.java:220)
        at sun.security.ssl.SSLSocketImpl.startHandshake(SSLSocketImpl.java:428)
        at com.mysql.cj.protocol.ExportControlled.performTlsHandshake(ExportControlled.java:336)
        at com.mysql.cj.protocol.StandardSocketFactory.performTlsHandshake(StandardSocketFactory.java:188)
        at com.mysql.cj.protocol.a.NativeSocketConnection.performTlsHandshake(NativeSocketConnection.java:99)
        at com.mysql.cj.protocol.a.NativeProtocol.negotiateSSLConnection(NativeProtocol.java:325)
또는 아래와 같이 에러가 나타나게 됩니다.
WARN: Establishing SSL connection without server's identity verification is not recommended.
According to MySQL 5.5.45+, 5.6.26+ and 5.7.6+ requirements SSL connection must be established by default if explicit option isn't set.
For compliance with existing applications not using SSL the verifyServerCertificate property is set to 'false'.
You need either to explicitly disable SSL by setting useSSL=false, or set useSSL=true and provide truststore for server certificate verification.
Unable to create initial connections of pool.
com.mysql.jdbc.exceptions.jdbc4.CommunicationsException: Communications link failure
The last packet successfully received from the server was 142 milliseconds ago.
The last packet sent successfully to the server was 138 milliseconds ago.
    at sun.reflect.NativeConstructorAccessorImpl.newInstance0(Native Method)
    <... 중략 ...>
    at com.mysql.jdbc.MysqlIO.negotiateSSLConnection(MysqlIO.java:4901)
    at com.mysql.jdbc.MysqlIO.proceedHandshakeWithPluggableAuthentication(MysqlIO.java:1659)
    at com.mysql.jdbc.MysqlIO.doHandshake(MysqlIO.java:1226)
Caused by: javax.net.ssl.SSLHandshakeException: No appropriate protocol (protocol is disabled or cipher suites are inappropriate)
    at sun.security.ssl.HandshakeContext.<init>(HandshakeContext.java:171)
    at sun.security.ssl.ClientHandshakeContext.<init>(ClientHandshakeContext.java:98)
    at sun.security.ssl.TransportContext.kickstart(TransportContext.java:220)
    at sun.security.ssl.SSLSocketImpl.startHandshake(SSLSocketImpl.java:428)
    at com.mysql.jdbc.ExportControlled.transformSocketToSSLSocket(ExportControlled.java:188)
이럴 경우 크게 3가지를 방안이 있을 것 같습니다(나열된 것이 우선순위는 아님)
• 접속 url 에 useSSL=false 를 설정하여 SSL -> Non SSL 로 접속
• Java 버전을 291 버전보다 이전 버전으로 되돌리기
291 버전 이전은 281 입니다.
• MySQL 5.7 기준으로 TLSv1.2 지원을 하도록 구성
MySQL 5.7.27 이하의 바이너리 빌드 버전을 사용시에는 크게 2가지가 있을 것 같습니다.
- MySQL 5.7.28 이상으로 변경
- 기존 버전 그대로 사용을 해야 할 경우:
Source Compile 시 -DWITH_SSL=system 또는 경로를 지정하여
OpenSSL 로 컴파일을 하여 사용
MySQL 5.5,5.6,5.7 등에서 TLSv1.0 이나 TLSv1.1 로 사용중인 곳이 많을 것으로 예상되고 그에 따라서 MySQL을 SSL 로 접속하는 환경에서는 Java 버전에 따른 TLS 버전 변경 또한 같이 확인이 필요한 부분입니다.
MySQL SSL 로 접속
SSL 이 활성화된 MySQL 을 접속 하는 건 일반적인 접속에서 환경에 따라서 옵션(속성)을 지정하거나 또는 자동으로 SSL 로 접속이 되기도 합니다.
Workbench 에서 접속
Workbench 나 다른 GUI 툴도 동일하게 MySQL 서버에서 SSL 이 설정되었다면 바로 SSL 로 접속할 수 있습니다.
workbench의 경우 SSL 탭을 보면 SSL 이 가능하면 이용을 하는 것이 기본값으로 되어있습니다.
접속정보를 입력 후 Test Connection 을 클릭하면 SSL 로 접속이 가능한 MySQL 서버 일 경우 아래와 같이 접속 가능한 cipher suites 정보를 보여주게 됩니다.
만약 접속이 안되는 MySQL 서버로 접속하게 되면 아래와 같이 SSL: not enabled 라고 확인되게 됩니다.
mysql client 에서 접속
mysql client 에서 접속 시 접속하는 서버가 SSL 이 설정되어 있으면 SSL 로 접속되며 접속 가능한 가장 높은 TLS 버전으로 접속을 하게 됩니다.
아래와 같이 일반적으로 접속하는 형태로 접속을 하면 SSL 로 통신이 가능한 MySQL 서버는 SSL로 접속하게 됩니다.
접속 후 performance_schema.session_status 를 통해서 접속한 SSL 버전과 SSL cipher 정보를 알 수 있습니다.
~]# mysql -uroot -p비밀번호 -h IP주소

Welcome to the MySQL monitor.  Commands end with ; or \g.
Your MySQL connection id is 4
Server version: 5.7.34-log MySQL Community Server (GPL)
<...중략...>

mysql> SELECT *
     FROM performance_schema.session_status
     WHERE VARIABLE_NAME IN (
         'Ssl_version','Ssl_cipher'
     );
+---------------+-----------------------------+
| VARIABLE_NAME | VARIABLE_VALUE              |
+---------------+-----------------------------+
| Ssl_cipher    | ECDHE-RSA-AES128-GCM-SHA256 |
| Ssl_version   | TLSv1.2                     |
+---------------+-----------------------------+
또는 접속 후 status 를 통해 확인할 수 있습니다. status 로 조회 시 SSL 로 접속하였는지 유무에 따라서 아래와 같이 조회 결과가 차이 나게 됩니다.
-- SSL 로 접속시
mysql> status
--------------
mysql  Ver ... on x86_64 (MySQL Community Server - GPL)

Connection id:		15
Current database:
Current user:		root@192.168.56.1
SSL:			Cipher in use is ECDHE-RSA-AES128-GCM-SHA256 <------
Current pager:		stdout
Using outfile:		''
Using delimiter:	;
Server version:		5.7.34-log MySQL Community Server (GPL)
Protocol version:	10
Connection:		192.168.56.51 via TCP/IP
Server characterset:	latin1
Db     characterset:	latin1
Client characterset:	latin1
Conn.  characterset:	latin1
TCP port:		3307
Uptime:			6 hours 1 min 1 sec


-- Non-SSL 로 접속시
mysql> status
--------------
mysql  Ver ... on x86_64 (MySQL Community Server - GPL)

Connection id:		4
Current database:
Current user:		root@192.168.56.1
SSL:			Not in use  <------
Current pager:		stdout
Using outfile:		''
Using delimiter:	;
Server version:		5.7.27-log MySQL Community Server (GPL)
Protocol version:	10
Connection:		192.168.56.51 via TCP/IP
Server characterset:	latin1
Db     characterset:	latin1
Client characterset:	latin1
Conn.  characterset:	latin1
TCP port:		3327
Uptime:			4 min 3 sec
DB 내에서 접속된 클라이언트 세션이 SSL을 통해 접속 중인지 관한 조회는 performance_schema 에서 확인할 수 있습니다.
mysql> SELECT id, user, host, connection_type
      FROM performance_schema.threads pst
      INNER JOIN information_schema.processlist isp
      ON pst.processlist_id = isp.id;

+---------+--------+---------------------+-----------------+--------------+------------------+
| id      | user   | host                | connection_type | THREAD_OS_ID | PROCESSLIST_TIME |
+---------+--------+---------------------+-----------------+--------------+------------------+
| 2585672 | root   | 127.0.0.1:35328     | SSL/TLS         |         5141 |               30 |
| 2721761 | test   | 192.168.56.45:59246 | TCP/IP          |         4661 |                0 |
| 2721757 | root   | localhost           | Socket          |         2594 |                0 |
| 2585671 | root   | 127.0.0.1:35324     | SSL/TLS         |        23729 |               30 |
+---------+--------+---------------------+-----------------+--------------+------------------+
• connection_type 에서 SSL/TLS 로 보이는 세션이 SSL을 통한 접속을 한 쓰레드입니다.
• TCP/IP 로 확인되는 세션은 SSL을 사용하지 않는 일반 접속 방식의 세션입니다.
• Socket 은 SSH 등으로 서버로 접속 한 다음 MySQL 로 접속한 유형입니다.
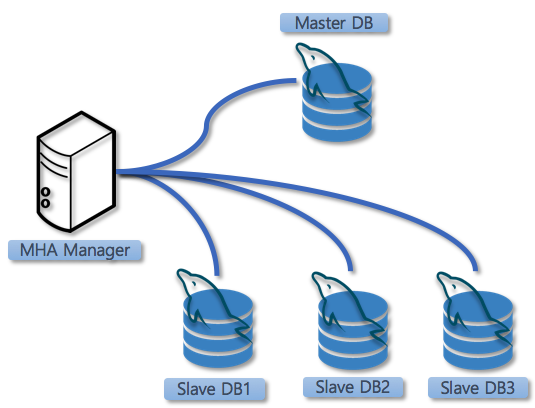
SSL Replication 설정
MySQL Replication(복제) 에서도 SSL을 사용할 수 있습니다.
binlog Pos Replication
먼저 일반적인 replication 방식인 binlog 파일과 log position 을 이용한 replication 을 구성하도록 하겠습니다
[참고] SSL 위주의 확인 및 테스트 임으로 mysqldump 없이 바로 replication 구성을 진행하였습니다.
Replication에 대한 자세한 내용은 아래 포스팅을 참조하시면 됩니다.

Master 환경 구성
유저 생성
Master 에서 Replication 에 사용할 유저를 생성하도록 하겠습니다.
mysql> use mysql;
mysql> create user 'repl_user'@'%' identified with mysql_native_password by 'repl_user';
mysql> grant replication slave,replication client on *.* to 'repl_user'@'%';
mysql> flush privileges;
Client 에서 사용할 인증서 전송
Slave(Replica) 에서 접속 시 필요한 Client 인증서 파일을 전송합니다.
아래 파일을 Replica 서버로 전전송하면됩니다.
ca.pem
client-cert.pem
client-key.pem
-- data directory 로 이동
~ ]# cd /mysql_data/5.7


-- 인증서 파일 tar 묶음
~ ]# tar cvf ssl_cert.tar ca.pem client-cert.pem client-key.pem


-- 파일 전송
~ ]# rsync --progress ssl_cert.tar 192.168.56.104:~/
Client Replicaton 설정
인증서 파일
전송받은 인증서 파일의 압축 해제 등을 진행합니다. 기존의 인증서 파일과 겹치지 않도록 별도의 디렉토리를 생성 후 파일의 압축해제 하겠습니다.
~ ]# mkdir -p /mysql_data/5.7/cert/56.51

~ ]# tar xvf ssl_cert.tar -C /mysql_data/5.7/cert/56.51

~ ]# chown -R mysql:mysql /mysql_data/5.7/cert/56.51
인증서 파일 경로는 /mysql_data/5.7/cert/56.51 에 존재합니다.
server-id 변경
Master 와 Slave 의 server-id 가 같은 경우(보통 1) Slave 서버에서 server-id 를 변경을 해야 합니다.
my.cnf 파일을 편집하여 server-id 값을 수정합니다.
[mysqld]
server-id=2
my.cnf 을 수정하였다면 MySQL 을 재시작 합니다.
Replication 설정
MySQL 의 재시작이 완료되었다면 change master 를 통해서 복제 시작하도록 하겠습니다.
mysql> CHANGE MASTER TO
MASTER_HOST='192.168.56.51',
MASTER_USER='repl_user',
MASTER_PORT=3307,
MASTER_PASSWORD='repl_user',
MASTER_SSL=1,
MASTER_SSL_CA = '/mysql_data/5.7/cert/56.51/ca.pem',
MASTER_SSL_CERT = '/mysql_data/5.7/cert/56.51/client-cert.pem',
MASTER_SSL_KEY = '/mysql_data/5.7/cert/56.51/client-key.pem';


mysql> start slave;
일반적인 Replication 설정과 차이는 MASTER_SSL 로 시작하는 추가 변수가 존재한다는 것입니다.
replication 상태를 확인 및 Master 서버에서의 클라이언트 session_type 을 확인해보도록 하겠습니다.
mysql> show slave status\G
*************************** 1. row ***************************
               Slave_IO_State: Waiting for master to send event
                  Master_Host: 192.168.56.51
                  Master_User: repl_user
                  Master_Port: 3307
                Connect_Retry: 60
              Master_Log_File: mysql-57-bin.000008
          Read_Master_Log_Pos: 792
               Relay_Log_File: wmp-relay-bin.000012
                Relay_Log_Pos: 323
        Relay_Master_Log_File: mysql-57-bin.000008
             Slave_IO_Running: Yes
            Slave_SQL_Running: Yes
          Exec_Master_Log_Pos: 792
              Relay_Log_Space: 697
              Until_Condition: None
           Master_SSL_Allowed: Yes
           Master_SSL_CA_File: /mysql_data/5.7/cert/56.51/ca.pem
           Master_SSL_CA_Path:
              Master_SSL_Cert: /mysql_data/5.7/cert/56.51/client-cert.pem
            Master_SSL_Cipher:
               Master_SSL_Key: /mysql_data/5.7/cert/56.51/client-key.pem
        Seconds_Behind_Master: 0
Master_SSL_Verify_Server_Cert: No
  Replicate_Ignore_Server_Ids:
             Master_Server_Id: 1
                  Master_UUID: b6184b03-eb0c-11eb-83ac-080027ea8e1e
             Master_Info_File: /usr/local/mysql-5.7.33-linux-glibc2.12-x86_64/data/master.info
                    SQL_Delay: 0
          SQL_Remaining_Delay: NULL
      Slave_SQL_Running_State: Slave has read all relay log; waiting for more updates
           Master_Retry_Count: 86400
               Master_SSL_Crl:
           Master_SSL_Crlpath:
           Retrieved_Gtid_Set:
            Executed_Gtid_Set:
                Auto_Position: 0
         Replicate_Rewrite_DB:
           Master_TLS_Version:
입력한 Cert 파일정보가 정상적으로 확인되며 replication 도 에러가 없는 상태입니다.
Master 에서 접속한 세션정보를 확인해보면 아래와 같이 replication이 SSL을 통해 접속되어 있는 것을 확인할 수 있습니다.
-- Master 에서 조회
mysql>  SELECT id, user, host, connection_type
       FROM performance_schema.threads pst
       INNER JOIN information_schema.processlist isp
       ON pst.processlist_id = isp.id;
+----+-----------+----------------------+-----------------+
| id | user      | host                 | connection_type |
+----+-----------+----------------------+-----------------+
| 13 | root      | 192.168.56.1:58899   | SSL/TLS         |
| 14 | root      | 192.168.56.1:58900   | SSL/TLS         |
| 37 | repl_user | 192.168.56.104:38666 | SSL/TLS         | <--
| 38 | root      | localhost            | Socket          |
+----+-----------+----------------------+-----------------+
[참고] Replication 시작 후 SSL_CTX_set_default_verify_paths failed 에러 발생시
RHEL/Oracle Linux/CentOS 에서 SELinux 사용시 발생될 수 있으며 아래와 같이 SELinux 권한을 추가하면 됩니다.
/bin/chcon -R -u system_u \
-r object_r -t mysqld_db_t /mysql_data/5.7/cert/56.51
위의 경로(/mysql_data/5.7/cert/56.51) 은 포스팅의 예시로 실제로 인증서 파일을 위치한 경로 디렉토리에 실행하면 됩니다.
GTID Replication
이번에는 GTID 기반의 복제를 구성하도록 하겠습니다.
먼저 이전 단계에서 진행한 Replication 정보를 삭제하도록 하겠습니다.
-- Slave 서버에서 실행
mysql> stop slave;

mysql> reset slave all;
GTID 활성화
GTID 기반 복제를 하기 위해서는 GTID 모드로 변경을 해야 합니다.
GTID 복제에 대한 자세한 내용은 아래 포스팅을 참조하시면 됩니다.
Master 와 Slave 에서 모두 아래 2개 파라미터를 적용 후 MySQL 을 재시작 합니다.
[mysqld]

gtid-mode=ON
enforce-gtid-consistency=ON
재시작 후 조회해보면 아래와 같이 GTID_MODE 가 ON 인 것을 확인할 수 있습니다.
mysql> show variables like 'gtid_mode';
+---------------+-------+
| Variable_name | Value |
+---------------+-------+
| gtid_mode     | ON    |
+---------------+-------+
Replication 실행
이제 Slave(Replica)에서 Replication 을 실행합니다.
mysql> CHANGE MASTER TO
MASTER_HOST='192.168.56.51',
MASTER_USER='repl_user',
MASTER_PORT=3307,
MASTER_PASSWORD='repl_user',
MASTER_AUTO_POSITION = 1 ,
MASTER_SSL=1,
MASTER_SSL_CA = '/mysql_data/5.7/cert/56.51/ca.pem',
MASTER_SSL_CERT = '/mysql_data/5.7/cert/56.51/client-cert.pem',
MASTER_SSL_KEY = '/mysql_data/5.7/cert/56.51/client-key.pem';
위에서 binlog log pos 기반 복제 설정한것과 거의 유사하며 MASTER_AUTO_POSITION 구문이 추구가 되었습니다.
Replication 의 복제 상태를 확인해보도록 하겠으며 아래와 같이 정상적으로 복제가 되고 있었습니다.
mysql> show slave status\G
*************************** 1. row ***************************
               Slave_IO_State: Waiting for master to send event
                  Master_Host: 192.168.56.51
                  Master_User: repl_user
                  Master_Port: 3307
                Connect_Retry: 60
              Master_Log_File: mysql-57-bin.000010
          Read_Master_Log_Pos: 154
               Relay_Log_File: wmp-relay-bin.000002
                Relay_Log_Pos: 373
        Relay_Master_Log_File: mysql-57-bin.000010
             Slave_IO_Running: Yes
            Slave_SQL_Running: Yes
                   Last_Errno: 0
                   Last_Error:
                 Skip_Counter: 0
          Exec_Master_Log_Pos: 154
              Relay_Log_Space: 578
              Until_Condition: None
               Until_Log_File:
                Until_Log_Pos: 0
           Master_SSL_Allowed: Yes
           Master_SSL_CA_File: /mysql_data/5.7/cert/56.51/ca.pem
           Master_SSL_CA_Path:
              Master_SSL_Cert: /mysql_data/5.7/cert/56.51/client-cert.pem
            Master_SSL_Cipher:
               Master_SSL_Key: /mysql_data/5.7/cert/56.51/client-key.pem
        Seconds_Behind_Master: 0
Master_SSL_Verify_Server_Cert: No
  Replicate_Ignore_Server_Ids:
             Master_Server_Id: 1
                  Master_UUID: b6184b03-eb0c-11eb-83ac-080027ea8e1e
             Master_Info_File: /usr/local/mysql-5.7.33-linux-glibc2.12-x86_64/data/master.info
                    SQL_Delay: 0
          SQL_Remaining_Delay: NULL
      Slave_SQL_Running_State: Slave has read all relay log; waiting for more updates
           Master_Retry_Count: 86400
                  Master_Bind:
               Master_SSL_Crl:
           Master_SSL_Crlpath:
           Retrieved_Gtid_Set: b6184b03-eb0c-11eb-83ac-080027ea8e1e:1-2
            Executed_Gtid_Set: b6184b03-eb0c-11eb-83ac-080027ea8e1e:1-2
                Auto_Position: 1
         Replicate_Rewrite_DB:
                 Channel_Name:
           Master_TLS_Version:
이번에도 동일하게 master 서버에서 접속 type 을 확인해보도록 하겠습니다.
mysql> SELECT id, user, host, connection_type
       FROM performance_schema.threads pst
       INNER JOIN information_schema.processlist isp
       ON pst.processlist_id = isp.id;
+----+-----------+----------------------+-----------------+
| id | user      | host                 | connection_type |
+----+-----------+----------------------+-----------------+
| 2  | repl_user | 192.168.56.104:38666 | SSL/TLS         |
| 3  | root      | localhost            | Socket          |
+----+-----------+----------------------+-----------------+
replication 접속 세션에 대해서 SSL/TLS 로 접속되어 있는 것을 확인할 수 있습니다.
여기까지 해서 포스팅을 마무리하도록 하겠습니다.
Reference
Reference Link
• dev.mysql.com/news-5-6-6.html [L]
• dev.mysql.com/5.6/source-configuration [L]
• dev.mysql.com/5.6/source-configuration [L]
• dev.mysql.com/8.0/source-configuration [L]
• dev.mysql.com/encrypted-connection [L]
• dev.mysql.com/5.6/source-ssl-library [L]
• dev.mysql.com/5.7/source-ssl-library [L]
• dev.mysql.com/8.0/source-ssl-library [L]
• mysqlserverteam.com/mysql-8-0-4-openssl [L]
• dev.mysql.com/binary-installation [L]
• aws.amazon.com/ko_kr/ssl-certificate [L]
• dev.mysql.com/encrypted-connection-protocols [L]
연관성 있는 다른 글


Principal DBA(MySQL, AWS Aurora, Oracle)
핀테크 서비스인 핀다에서 데이터베이스를 운영하고 있어요(at finda.co.kr)
Previous - 당근마켓, 위메프, Oracle Korea ACS / Fedora Kor UserGroup 운영중
Database 외에도 NoSQL , Linux , Python, Cloud, Http/PHP CGI 등에도 관심이 있습니다
purityboy83@gmail.com / admin@hoing.io