


Last Updated on 7월 13, 2024 by Jade(정현호)
안녕하세요
이번 포스팅은 MHA 설치 및 구성이 완료된 이후 VIP스크립트 생성 및 설정, MHA 모니터링, Takeover 및 장애에 대한 Failover 등을 확인해 보도록 하겠습니다.
MHA의 3번째 글로 아래 포스팅에서 이어지는 글입니다.
MySQL 8 버전 환경의 MHA글은 아래 포스팅을 참조하시면 됩니다.(RockyLinux 8, ProxySQL 사용)
2Node(Server) 환경에서 Keepalived를 활용한 VIP Failover 관련된 글은 다음 포스팅을 참조하시면 됩니다.(MHA+Keepalived)

Contents
VIP 설정 변경 및 스크립트 생성
MHA에서 VIP 사용하기 위해서는 먼저 master_ip_failover / master_ip_online_change 파일 수정이 필요 합니다
장애가 감지 감지되면 ster_ip_failover 가 사용되며, 사용자 정의 takeover(relocate) 시 master_ip_online_change 이 사용됩니다.
master_ip_failover 수정
* 매니저 노드에서 수행
[mha]$ cd /masterha/scripts/
[mha]$ cp -ar master_ip_failover master_ip_failover.ori
[mha]$ vi master_ip_failover
== 변경 전 - 86 라인
## Creating an app user on the new master
print "Creating app user on the new master..n";
FIXME_xxx_create_user( $new_master_handler->{dbh} );
$new_master_handler->enable_log_bin_local();
$new_master_handler->disconnect();
## Update master ip on the catalog database, etc
FIXME_xxx;
== 변경 후
## Creating an app user on the new master
## print "Creating app user on the new master..n";
## FIXME_xxx_create_user( $new_master_handler->{dbh} );
## $new_master_handler->enable_log_bin_local();
## $new_master_handler->disconnect();
## Update master ip on the catalog database, etc
## FIXME_xxx;
== mha_change_vip.sh 추가
## Update master ip on the catalog database, etc
## FIXME_xxx;
system("/bin/bash /masterha/scripts/mha_change_vip.sh $new_master_ip"); <-- 추가
$exit_code = 0;
master_ip_online_change 수정
* 매니저 노드에서 수행
[mha]$ cd /masterha/scripts
[mha]$ cp -ar master_ip_online_change master_ip_online_change.ori
[mha]$ vi master_ip_online_change
= 변경 전 - 149 라인
## Drop application user so that nobody can connect. Disabling per-session binlog beforehand
$orig_master_handler->disable_log_bin_local();
print current_time_us() . " Drpping app user on the orig master..n";
FIXME_xxx_drop_app_user($orig_master_handler);
= 변경 후 , 주석 처리
## Drop application user so that nobody can connect. Disabling per-session binlog beforehand
## $orig_master_handler->disable_log_bin_local();
## print current_time_us() . " Drpping app user on the orig master..n";
## FIXME_xxx_drop_app_user($orig_master_handler);
= 변경 전 - 244 라인
## Creating an app user on the new master
print current_time_us() . " Creating app user on the new master..n";
FIXME_xxx_create_app_user($new_master_handler);
$new_master_handler->enable_log_bin_local();
$new_master_handler->disconnect();
= 변경 후 , 주석 처리
## Creating an app user on the new master
## print current_time_us() . " Creating app user on the new master..n";
## FIXME_xxx_create_app_user($new_master_handler);
## $new_master_handler->enable_log_bin_local();
## $new_master_handler->disconnect();
== mha_change_vip.sh 추가
## Update master ip on the catalog database, etc
system("/bin/bash /masterha/scripts/mha_change_vip.sh $new_master_ip"); <-- 추가
$exit_code = 0;
};
mha_change_vip.sh 파일 생성
[mha]$ cd /masterha/scripts
[mha]$ vi mha_change_vip.sh
* 아래 내용으로 스크립트를 작성합니다.
* 포스팅에서 사용하는 Nic은 enp0s3 이고 vip 의 호스트네임은 mha-master-vip 입니다.
* 사용하는 환경에 따라 Nic 이름의 변경이 필요 합니다.
* 아래 스크립트 내용 중에서 netmask 255.255.255.0 는 네트워크 디바이스 구성(설정)에 따라 달라질 수 있습니다.
ifconfig 명령어를 통해서 가상 IP 를 Assign 하려는 네트워크 디바이스에 설정된 netmask 정보를 확인 해보시기 바랍니다.
#!/bin/bash
## Fail-Over VIP Change

V_NEW_MASTER=`cat /etc/hosts | grep $1 | awk '{print $2}'`
V_EXIST_VIP_CHK=`ping -c 1 -W 1 mha-master-vip | grep "packet loss" | awk '{print $6}'`
V_VIP_IP=`cat /etc/hosts | grep mha-master-vip | awk '{print $1}'`

if [ $V_EXIST_VIP_CHK = "0%" ]
then
    echo "VIP IS Alive, VIP Relocate $V_NEW_MASTER "
    /bin/ssh -o StrictHostKeyChecking=no mha-master-vip /bin/sudo /sbin/ifconfig enp0s3:0 down &

    ssh -o StrictHostKeyChecking=no $V_NEW_MASTER /bin/sudo /sbin/ifconfig enp0s3:0 $V_VIP_IP netmask 255.255.255.0
    ssh -o StrictHostKeyChecking=no $V_NEW_MASTER /sbin/arping -c 5 -D -I enp0s3 -s $V_VIP_IP $V_VIP_IP

    VIP_NOHUP_PS=`ps -ef| grep "ifconfig enp0s3:0" | grep ssh | grep -v grep | awk '{print $2}'` && kill -9 $VIP_NOHUP_PS


elif [ $V_EXIST_VIP_CHK = "100%" ]
then

    echo "VIP IS dead, VIP Relocate $V_NEW_MASTER "
    /bin/ssh -o StrictHostKeyChecking=no $V_NEW_MASTER /bin/sudo /sbin/ifconfig enp0s3:0 $V_VIP_IP netmask 255.255.255.0
    /bin/ssh -o StrictHostKeyChecking=no $V_NEW_MASTER /sbin/arping -c 5 -D -I enp0s3 -s $V_VIP_IP $V_VIP_IP

fi
실행 권한을 부여합니다.
[mha]$ chmod 755 mha_change_vip.sh
# VIP 회수 및 가동 여부를 확인을 위해 각 노드별로 한 번씩 수행을 합니다.
[mha]$ ./mha_change_vip.sh 192.168.56.51
[mha]$ ping -c 5 mha-master-vip
[mha]$ ./mha_change_vip.sh 192.168.56.52
[mha]$ ping -c 5 mha-master-vip
[mha]$ ./mha_change_vip.sh 192.168.56.56
[mha]$ ping -c 5 mha-master-vip
MHA 사용법 - 모니터링 및 체크
여기까지 설정 및 생성 등을 완료하였다면 MHA 를 통해 모니터링 및 여러 가지 체크 기능을 사용할 수 있는 단계까지 준비된 상태입니다.
먼저 사용할 수 있는 주요 명령어 를 살펴보면 아래와 같습니다.
masterha_check_ssh : SSH 접속 체크
masterha_manager Manager 실행(모니터링 시작) - 장애 발생시 failover 수행됨
masterha_stop : Manager 중지
masterha_master_switch : TakeOver(relocate) 수행
masterha_check_repl : 복제 현황(Master/Slave 노드 정보등)
masterha_check_status : Status 확인하기
* MHA 기능 수행은 위에서 생성한 OS유저 인 mha 로 수행합니다.
* 실행은 매니저 서버에서 합니다
한가지씩 살펴보도록 하겠습니다.
masterha_check_ssh
masterha_check_ssh 는 SSH 접속 체크 를 수행합니다.
[mha]$ masterha_check_ssh --conf=/etc/masterha/app1.cnf
Sat 2020 - [warning] Global configuration file /etc/masterha_default.cnf not found. Skipping.
Sat 2020 - [info] Reading application default configuration from /etc/masterha/app1.cnf..
Sat 2020 - [info] Reading server configuration from /etc/masterha/app1.cnf..
Sat 2020 - [info] Starting SSH connection tests..
Sat 2020 - [debug]
Sat 2020 - [debug] Connecting via SSH from mha@acs(192.168.56.51:22) to mha@acs2(192.168.56.52:22)..
Sat 2020 - [debug] ok.
Sat 2020 - [debug] Connecting via SSH from mha@acs(192.168.56.51:22) to mha@acs3(192.168.56.56:22)..
Sat 2020 - [debug] ok.
Sat 2020 - [debug]
Sat 2020 - [debug] Connecting via SSH from mha@acs2(192.168.56.52:22) to mha@acs(192.168.56.51:22)..
Sat 2020 - [debug] ok.
Sat 2020 - [debug] Connecting via SSH from mha@acs2(192.168.56.52:22) to mha@acs3(192.168.56.56:22)..
Sat 2020 - [debug] ok.
Sat 2020 - [debug]
Sat 2020 - [debug] Connecting via SSH from mha@acs3(192.168.56.56:22) to mha@acs(192.168.56.51:22)..
Sat 2020 - [debug] ok.
Sat 2020 - [debug] Connecting via SSH from mha@acs3(192.168.56.56:22) to mha@acs2(192.168.56.52:22)..
Sat 2020 - [debug] ok.
Sat 2020 - [info] All SSH connection tests passed successfully.
masterha_check_repl
Replication 에 대해서 Master/Slave 노드 정보 등을 체크하게 됩니다.
[mha]$ masterha_check_repl --conf=/etc/masterha/app1.cnf
[info] Reading application default configuration from /etc/masterha/app1.cnf..
[info] Reading server configuration from /etc/masterha/app1.cnf..
[info] MHA::MasterMonitor version 0.58.
[info] Alive Servers:
[info] acs(192.168.56.51:3306)
[info] acs2(192.168.56.52:3306)
[info] acs3(192.168.56.56:3306)
[info] Alive Slaves:
[info] acs2(192.168.56.52:3306) Version=5.7.31-log log-bin:enabled
[info] Replicating from acs(192.168.56.51:3306)
[info] Primary candidate for the new Master (candidate_master is set)
[info] acs3(192.168.56.56:3306) Version=5.7.31-log log-bin:enabled
[info] Replicating from acs(192.168.56.51:3306)
[info] Primary candidate for the new Master (candidate_master is set)
[info] Current Alive Master: acs(192.168.56.51:3306)
[info] Checking slave configurations..
[info] All SSH connection tests passed successfully.
[info] Checking MHA Node version..
[info] Version check ok.
Testing mysqlbinlog output.. done.
Cleaning up test file(s).. done.
Mon Dec 14 03:37:11 2020 - [info] Slaves settings check done.
Mon Dec 14 03:37:11 2020 - [info]
acs(192.168.56.51:3306) (current master)
+--acs2(192.168.56.52:3306)
+--acs3(192.168.56.56:3306)
[info] Checking replication health on acs2..
[info] ok.
[info] Checking replication health on acs3..
[info] ok.
[info] Checking master_ip_failover_script status:
[info] OK.
[warning] shutdown_script is not defined.
[info] Got exit code 0 (Not master dead).
MySQL Replication Health is OK.
masterha_check_status
masterha_check_status 는 매니저 프로세스 체크 기능을 수행합니다.
매니저 프로세스 구동되어 있을 경우
[mha]$ masterha_check_status --conf=/etc/masterha/app1.cnf
app1 (pid:14926) is running(0:PING_OK), master:acs
매니저 프로세스 실행중이지 않을 때
[mha]$ masterha_check_status --conf=/etc/masterha/app1.cnf
app1 is stopped(2:NOT_RUNNING).
masterha_manager
이제 장애 발생시 Failover 가 동작 할 수 있도록 매니저를 시작하도록 하겠습니다.
매니저 기동 및 모니터링 시작
[mha]$ nohup masterha_manager \
--conf=/etc/masterha/app1.cnf \
--last_failover_minute=1 &
MHA가 마스터 DB 모니터링 중에 장애가 감지되어 failover 가 발생된 이후 일정 시간내에 장애에 대해서는 failover 가 진행되지 않습니다.
계속된 문제로 failover 가 Ping pong 형태로 반복되는 것을 고려하여 장애가 발생하여 failover 가 한번 처리된 후 일정 시간안에는 failover가 되지 않으며 기본 값은 8시간입니다.
이와 관련된 수행 옵션이 있으며 last_failover_minute 옵션입니다
포스팅에서는 반복적으로 테스트 를 위하여 1분으로 지정하고 수행하였습니다.
실제 사용시에도 장애 이후 다음 failover 시간의 gap이 8시간이 너무 크다고 생각된다면 last_failover_minute 를 통해 조절하시면 됩니다
실행 후 로그
[mha]$ cd /masterha/app1
[mha]$ tail -100f app1.log
[info] MHA::MasterMonitor version 0.58.
[info] Alive Servers:
[info] acs(192.168.56.51:3306)
[info] acs2(192.168.56.52:3306)
[info] acs3(192.168.56.56:3306)
[info] Alive Slaves:
[info] acs2(192.168.56.52:3306) Version=5.7.31-log log-bin:enabled
[info] Replicating from acs(192.168.56.51:3306)
[info] Primary candidate for the new Master (candidate_master is set)
[info] acs3(192.168.56.56:3306) Version=5.7.31-log log-bin:enabled
[info] Replicating from acs(192.168.56.51:3306)
[info] Primary candidate for the new Master (candidate_master is set)
[info] Current Alive Master: acs(192.168.56.51:3306)
[info] Checking slave configurations..
[info] Starting SSH connection tests..
[info] All SSH connection tests passed successfully.
[info] Checking MHA Node version..
[info] HealthCheck: SSH to acs is reachable.
[info] Master MHA Node version is 0.58.
[info] Checking recovery script configurations on acs(192.168.56.51:3306)..
[info] Executing command: save_binary_logs --command=test ....
[info] Connecting to mha@192.168.56.51(acs:22)..
Binlog found at /usr/local/mysql/logs, up to binlog.000020
[info] Binlog setting check done.
[info] Connecting to mha@192.168.56.52(acs2:22)..
acs(192.168.56.51:3306) (current master)
+--acs2(192.168.56.52:3306)
+--acs3(192.168.56.56:3306)
[info] Checking master_ip_failover_script status:
[info] /masterha/scripts/master_ip_failover ...
[info] OK.
[warning] shutdown_script is not defined.
[info] Set master ping interval 3 seconds.
[info] Set secondary check script: /usr/local/bin/masterha_secondary_check -s acs2 -s acs3 --user=mha --master_host=acs --master_ip=acs --master_port=3306
Mon Dec 14 03:52:31 2020 - [info] Starting ping health check on acs(192.168.56.51:3306)..
Mon Dec 14 03:52:31 2020 - [info] Ping(SELECT) succeeded, waiting until MySQL doesn't respond..
Master 의 VIP Assign
Master 서버에서 VIP 를 할당하여 기동 은 ifconfig 로 할 수 있으며 root 가 아닌 mha 일반 유저에서 시작할 수 있도록 이전에 ifconfig에 대해서 sudo 권한을 제한적으로 설정해 두었습니다.
sudo 설정으로 인하여 mha 일반 유저에서도 아래와 같이 vip up/down이 가능 합니다.
[mha]$ sudo ifconfig enp0s3:0 192.168.56.50 netmask 255.255.255.0 up

또는

[mha]$ sudo ifconfig enp0s3:0 mhm-master-vip netmask 255.255.255.0 up
VIP 가 할당되면 아래와 같이 지정한 가상 디바이스에 IP가 할당된 것을 확인할 수 있습니다
(enp0s3:0 에서 vip 시작됨)
[mha]$ ifconfig -a
enp0s3: flags=4163<UP,BROADCAST,RUNNING,MULTICAST> mtu 1500
inet 192.168.56.51 netmask 255.255.255.0 broadcast 192.168.56.255


enp0s3:0: flags=4163<UP,BROADCAST,RUNNING,MULTICAST> mtu 1500
inet 192.168.56.50 netmask 255.255.255.0 broadcast 192.168.56.255
참고로 네트워크 device 명은 설치 및 구성된 OS 에 따라 다릅니다.
장애 발생 - Failover
장애가 발생될 경우 MHA에 의해 MySQL의 Failover 수행 동작을 확인해 보도록 하겠습니다.
마스터 서버에서 kill 명령어나 서비스 명령어(systemctl) 로 MySQL 인스턴스를 종료하여 장애를 발생시키도록 하겠습니다.
매니저 프로세스 확인 및 DB 중지
매니저 서버 모니터링 프로세스 유무 확인
[mha]$ ps -ef| grep masterha
mha perl /usr/local/bin/masterha_manager <중략>
마스터 서버, MySQL 중지
[root]# systemctl stop mysqld
MHA Failover Logs
위에서 마스터 DB 인스턴스를 종료하면서 장애를 발생시켰습니다.
MHA는 이를 감지하여 failover 가 진행되었고 로그에서 아래와 같은 내용으로 진행된 상황을 확인할 수 있습니다.
MHA failover 로그
reachable, Master is not reachable from acs2. OK.
reachable, Master is not reachable from acs3. OK.
[info] Master is not reachable from all other monitoring servers. Failover should start.
[warning] Got error on MySQL connect: 2003 (Can't connect to MySQL server on '192.168.56.51' (111))
[warning] Connection failed 2 time(s)..
[warning] Got error on MySQL connect: 2003 (Can't connect to MySQL server on '192.168.56.51' (111))
[warning] Connection failed 3 time(s)..
[warning] Got error on MySQL connect: 2003 (Can't connect to MySQL server on '192.168.56.51' (111))
[warning] Connection failed 4 time(s)..
[warning] Master is not reachable from health checker!
[warning] Master acs(192.168.56.51:3306) is not reachable!
[info] Dead Servers:
[info] acs(192.168.56.51:3306)
[info] Alive Servers:
[info] acs2(192.168.56.52:3306)
[info] acs3(192.168.56.56:3306)
[info] Alive Slaves:
[info] acs2(192.168.56.52:3306) Version=5.7.31-log (oldest major version between slaves) log-bin:enabled
[info] Replicating from acs(192.168.56.51:3306)
[info] Primary candidate for the new Master (candidate_master is set)
[info] acs3(192.168.56.56:3306) Version=5.7.31-log (oldest major version between slaves) log-bin:enabled
[info] Replicating from acs(192.168.56.51:3306)
[info] Primary candidate for the new Master (candidate_master is set)
[info] Replication filtering check ok.
[info] Master is down!
[info] Terminating monitoring script.
[info] Got exit code 20 (Master dead).
[info] MHA::MasterFailover version 0.58.
[info] Starting master failover.
[info] * Phase 1: Configuration Check Phase..
[info] GTID failover mode = 0
[info] Dead Servers:
[info] acs(192.168.56.51:3306)
[info] Checking master reachability via MySQL(double check)...
[info] ok.
[info] Alive Servers:
[info] acs2(192.168.56.52:3306)
[info] acs3(192.168.56.56:3306)
[info] Alive Slaves:
[info] acs2(192.168.56.52:3306) Version=5.7.31-log log-bin:enabled
[info] Replicating from acs(192.168.56.51:3306)
[info] Primary candidate for the new Master (candidate_master is set)
[info] acs3(192.168.56.56:3306) Version=5.7.31-log log-bin:enabled
[info] Replicating from acs(192.168.56.51:3306)
[info] Primary candidate for the new Master (candidate_master is set)
[info] * Phase 3: Master Recovery Phase..
[info]
[info] * Phase 3.1: Getting Latest Slaves Phase..
[info]
[info] The latest binary log file/position on all slaves is binlog.000020:154
[info] Latest slaves (Slaves that received relay log files to the latest):
[info] acs2(192.168.56.52:3306) Version=5.7.31-log (oldest major version between slaves) log-bin:enabled
[info] Replicating from acs(192.168.56.51:3306)
[info] Primary candidate for the new Master (candidate_master is set)
[info] acs3(192.168.56.56:3306) Version=5.7.31-log (oldest major version between slaves) log-bin:enabled
[info] Replicating from acs(192.168.56.51:3306)
[info] Primary candidate for the new Master (candidate_master is set)
[info] The oldest binary log file/position on all slaves is binlog.000020:154
[info] Oldest slaves:
[info] acs2(192.168.56.52:3306) Version=5.7.31-log (oldest major version between slaves) log-bin:enabled
[info] Replicating from acs(192.168.56.51:3306)
[info] Primary candidate for the new Master (candidate_master is set)
[info] acs3(192.168.56.56:3306) Version=5.7.31-log (oldest major version between slaves) log-bin:enabled
[info] Replicating from acs(192.168.56.51:3306)
[info] Primary candidate for the new Mast
[info] New master is acs2(192.168.56.52:3306)
[info] Starting master failover..
From:
acs(192.168.56.51:3306) (current master)
+--acs2(192.168.56.52:3306)
+--acs3(192.168.56.56:3306)
To:
acs2(192.168.56.52:3306) (new master)
+--acs3(192.168.56.56:3306)
[info] Executing master IP activate script:
Set read_only=0 on the new master.
Getting new master's binlog name and position..
binlog.000073:30820278
All other slaves should start replication from here.
Statement should be: CHANGE MASTER TO MASTER_HOST='acs2 or 192.168.56.52',
MASTER_PORT=3306, MASTER_LOG_FILE='binlog.000073', MASTER_LOG_POS=30820278,
MASTER_USER='repl_user', MASTER_PASSWORD='xxx';
VIP IS Alive,VIP Relocate acs2
ARPING 192.168.56.50 from 192.168.56.50 enp0s3
Sent 5 probes (5 broadcast(s))
Received 0 response(s)
[info] OK.
[info] Master failover to acs2(192.168.56.52:3306) completed successfully.
[info]
----- Failover Report -----
app1: MySQL Master failover acs(192.168.56.51:3306) to acs2(192.168.56.52:3306) succeeded
Master acs(192.168.56.51:3306) is down!
Check MHA Manager logs at wmp:/masterha/app1/app1.log for details.
Started automated(non-interactive) failover.
Invalidated master IP address on acs(192.168.56.51:3306)
The latest slave acs2(192.168.56.52:3306) has all relay logs for recovery.
Selected acs2(192.168.56.52:3306) as a new master.
acs2(192.168.56.52:3306): OK: Applying all logs succeeded.
acs2(192.168.56.52:3306): OK: Activated master IP address.
acs3(192.168.56.56:3306): This host has the latest relay log events.
Generating relay diff files from the latest slave succeeded.
acs3(192.168.56.56:3306): OK: Applying all logs succeeded. Slave started, replicating from acs2(192.168.56.52:3306)
acs2(192.168.56.52:3306): Resetting slave info succeeded.
Master failover to acs2(192.168.56.52:3306) completed successfully.
장애가 발생시 정상적으로 failover 가 이루어지면 위와 같은 로그를 확인할 수 있습니다.
현재 failover 에 의해서 New Master 서버는 2번째(acs2) 가 되었으며 3번째(acs3) 서버는 2번 서버를 마스터로 바라보면서 복제가 수행 중입니다.
그리고 장애가 발생되어 failover가 되게 되면 매니저서버에서 구동중인 매니저 프로세스(모니터링) 은 종료되게 됩니다
([info] Terminating monitoring script.)
다시 모니터링을 하기 위해서는 1번 서버 마스터 서버의 정상화 후 1번 서버를 현재 마스터 서버인 2번 서버 로 설정하여 정상적으로 replication 설정을 해야 합니다.
신규 마스터로 복제를 설정
먼저 종료된 MySQL 를 다시 시작합니다.
[root]# systemctl start mysqld
DB 인스턴스에 접속합니다.
[root]# mysql --login-path=dba
CHANGE MASTER 실행
CHANGE MASTER 를 하기 위해서 MASTER_LOG_FILE, MASTER_LOG_POS 정보가 필요 합니다.
해당 정보는 failover 로그에서 "All other slaves should start replication from here" 항목에서 확인 할 수 있습니다.
All other slaves should start replication from here. Statement should be: CHANGE MASTER TO MASTER_HOST='acs2 or 192.168.56.52', MASTER_PORT=3306, MASTER_LOG_FILE='binlog.000073', MASTER_LOG_POS=30820278, MASTER_USER='repl_user', MASTER_PASSWORD='xxx';
위의 로그 정보로 CHANGE MASTER 를 실행합니다.
mysql> CHANGE MASTER TO MASTER_HOST='acs2',
MASTER_USER='repl_user',
MASTER_PASSWORD='repl_user',
MASTER_LOG_FILE='binlog.000073',
MASTER_LOG_POS=30820278;
mysql> start slave;
mysql> show slave status\G
Slave_IO_State: Waiting for master to send event
Master_Host: acs2
Master_User: repl_user
Master_Port: 3306
Connect_Retry: 60
Master_Log_File: binlog.000073
Read_Master_Log_Pos: 30820278
Relay_Log_File: relay_log.000002
Relay_Log_Pos: 317
Relay_Master_Log_File: binlog.000052
Slave_IO_Running: Yes
Slave_SQL_Running: Yes
<중략>
복제가 정상적으로 수행되었다면 read_only를 활성화합니다.
mysql> set global read_only=ON;
매니저 프로세스 시작
종료가 된 1번 MySQL 인스턴스가 정상화가 되었으며 이제 매니저 프로세스를 다시 시작하도록 하겠습니다.
매니저 기동(모니터링 수행)
[mha]$ nohup masterha_manager \
--conf=/etc/masterha/app1.cnf \
--last_failover_minute=1 &
app1.log 로그 내역
[mha]$ tail -100f app1.log
<중략>
Mon Dec 14 05:33:23 2020 - [info] Slaves settings check done.
Mon Dec 14 05:33:23 2020 - [info]
acs2(192.168.56.52:3306) (current master)
+--acs(192.168.56.51:3306)
+--acs3(192.168.56.56:3306)
<중략>
사용자 정의 - Takeover
이번에는 사용자 임의의 Takeover 를 수행해보도록 하겠습니다. 사용하는 명령어는 masterha_master_switch 입니다
masterha_master_switch 명령어를 통해서 예약된 작업 등의 사유로 계획된 take over(relocate) 를 할 수 있습니다.
중요한점은 switch 시 매니저의 모니터링을 중지 해야 합니다.
현재 마스터/슬레이스 인스턴스 상태 정보
acs2(192.168.56.52:3306) (current master)
+--acs(192.168.56.51:3306)
+--acs3(192.168.56.56:3306)
현재 마스터는 두번째 서버입니다(acs2), 마스터를 1번 인스턴스로 relocate(Takeover) 하도록 하겠습니다.
모니터링 종료
switch 를 하기전에 먼저 매니저(모니터링) 를 종료 후 그 다음 switch 를 진행하면 됩니다.
매니저(모니터링) 종료
[mha]$ masterha_stop --conf=/etc/masterha/app1.cnf
매니저 프로세스 상태 확인
[mha]$ masterha_check_status --conf=/etc/masterha/app1.cnf
app1 is stopped(2:NOT_RUNNING).
Takeover(switch) 실행
매니저 서버에서 수행
take over 전에 replication 상태를 한번 체크합니다.
[mha]$ masterha_check_repl --conf=/etc/masterha/app1.cnf
take over(switch) 실행 (acs2 -> acs )
[mha]$ masterha_master_switch --master_state=alive \
--conf=/etc/masterha/app1.cnf --new_master_host=acs \
--interactive=0
옵션 설명
--master_state=alive | dead
master 서버가 장애로 인하여 수동적인 failover 를 하는 것이라면 --master_state=dead 라고 옵션을 사용해야 합니다.
master 서버가 정상이라면 alive 라고 입력합니다.
--new_master_host=호스트명
새로운 마스터가 될 호스트명 입력
--interactive=0 | 1
1번은 대화형으로 진행(default) 이며, 0번은 비대화식 입니다.
Takeover - 실행 로그
[info] Starting online master switch..
[info] * Phase 1: Configuration Check Phase..
[info] Reading application default configuration from /etc/masterha/app1.cnf..
[info] Reading server configuration from /etc/masterha/app1.cnf..
[info] Current Alive Master: acs2(192.168.56.52:3306)
[info] Alive Slaves:
[info] acs(192.168.56.51:3306) Version=5.7.31-log (oldest major version between slaves) log-bin:enabled
[info] Replicating from acs2(192.168.56.52:3306)
[info] Primary candidate for the new Master (candidate_master is set)
[info] acs3(192.168.56.56:3306) Version=5.7.29-log (oldest major version between slaves) log-bin:enabled
[info] Replicating from acs2(192.168.56.52:3306)
[info] Primary candidate for the new Master (candidate_master is set)
[info] Checking MHA is not monitoring or doing failover..
[info] Checking replication health on acs..
[info] ok.
[info] Checking replication health on acs3..
[info] ok.
[info] acs can be new master.
From:
acs2(192.168.56.52:3306) (current master)
+--acs(192.168.56.51:3306)
+--acs3(192.168.56.56:3306)
To:
acs(192.168.56.51:3306) (new master)
+--acs3(192.168.56.56:3306)
Mon Dec 14 05:46:45 2020 - [info] Checking whether acs(192.168.56.51:3306) is ok for the new master..
All other slaves should start replication from here.
Statement should be:
CHANGE MASTER TO MASTER_HOST='acs or 192.168.56.51',
MASTER_PORT=3306, MASTER_LOG_FILE='binlog.000088',
MASTER_LOG_POS=1195, MASTER_USER='repl_user',
MASTER_PASSWORD='xxx';
VIP IS Alive,VIP Relocate acs
ARPING 192.168.56.50 from 192.168.56.50 enp0s3
Sent 5 probes (5 broadcast(s))
Received 0 response(s)
[info] * Phase 5: New master cleanup phase..
[info] acs: Resetting slave info succeeded.
[info] Switching master to acs(192.168.56.51:3306) completed successfully.
이렇게 하면 1번 서버가 마스터서버가 되었으며, 3번 서버(슬레이브)는 1번 서버를 마스터로 복제를 수행되게 됩니다.
다시 정상화하기 위해서는 2번 서버를 1번 마스터 서버를 바라보고 복제가 수행될 수 있도록 설정을 해야 합니다.
2번 서버 복제 설정
마스터의 정보를 확인하기 위해서는 failover 와 마찬가지로 로그상에서 "All other slaves should start replication from here" 항목을 참조하시면 됩니다.
All other slaves should start replication from here. Statement should be: CHANGE MASTER TO MASTER_HOST='acs or 192.168.56.51', MASTER_PORT=3306, MASTER_LOG_FILE='binlog.000088', MASTER_LOG_POS=1195, MASTER_USER='repl_user', MASTER_PASSWORD='xxx';
위의 로그를 참조하여 CHANGE MASTER 를 수행합니다.
mysql> CHANGE MASTER TO MASTER_HOST='acs',
MASTER_USER='repl_user',
MASTER_PASSWORD='repl_user',
MASTER_LOG_FILE='binlog.000088',
MASTER_LOG_POS=1195;
mysql> start slave;
mysql> show slave status\G
복제가 정상적으로 수행되었다면 read_only를 활성화합니다.
mysql> set global read_only=ON;
매니저 프로세스 시작(모니터링 시작)
Takeover 및 복제 설정이 완료되었으므로 다시 매니저 프로세스를 시작하여 모니터링을 하도록 합니다.
매니저 서버 기동(모니터링 수행)
[mha]$ nohup masterha_manager \
--conf=/etc/masterha/app1.cnf \
--last_failover_minute=1 &
[참고] 포스팅에서는 Master VIP 생성 및 Master <-> Slave 서버 간의 VIP가 이동되는 보통의 방식으로 Master 인스턴스에 접속에 대한 고가용성을 구현하였습니다.
Master 1: Slave N 구조와 같은 유형에서 Client Side HA 를 고려하신다면 Proxy 솔루션을 사용도 한가지 방법입니다.
Proxy에는 HAProxy와 ProxySQL 그리고 그 외 다양한 요건의 Proxy 솔루션이 있습니다.
Proxy에 관한 글은 다음의 포스팅을 참조하시면 됩니다.
purge_relay_logs
MHA 에서는 relay_log_purge 기능 비활성화(0,off,false) 이 권장이며, fail-over 나 switch-over 시 relay log의 purge가 수행됩니다.
그 외 별도로 purge 가 필요한 경우 MHA 내에 제공되는 스크립트를 통해서 수행할 수 있습니다.
스크립트는 /usr/local/bin/purge_relay_logs 이며 실행 방법은 다음과 같으며, MySQL이 실행되는 서버에서 직접 실행합니다.
/usr/local/bin/purge_relay_logs \
--user=mha --password=mha \
--disable_relay_log_purge --port=3306
* mysql 을 접속할 수 있는 OS 유저로 수행하며 위의 명령어에서 mha 유저는 DB유저 입니다.
* 권한이 필요하며 관리자 계정(DB의 root유저) 나 권한을 받은 mha 계정으로 실행합니다.
스크립트는 아래의 내용이 수행됩니다.
relay_log_purge 기능 활성화 및 FLUSH LOGS 를 수행합니다.
1. Executing SET GLOBAL relay_log_purge=1;
2. FLUSH LOGS;
위의 명령어 수행 후 다시 relay_log_purge 기능 비활성화로 변경합니다.
3. SET GLOBAL relay_log_purge=0;
명령어를 커맨드 라인에서 수행해도 되고 스크립트로 만들어서 수행 및 crontab 에 등록하여 주기적으로 relay log 를 삭제를 진행할 수 있습니다.
예시 스크립트
/etc/masterha/clean_relay_log.sh
파일명이나 경로는 예시임으로 다른 경로와 파일명을 사용하여도 됩니다.
#!/bin/bash
CRL_USER=mha
CRL_PASSWORD=mha
CRL_PORT=3306
log_dir='/masterha/app1'
work_dir='/masterha/app1'
purge='/usr/local/bin/purge_relay_logs'
if [ ! -d $log_dir ]
then
   mkdir $log_dir -p
fi
$purge --user=$CRL_USER --password=$CRL_PASSWORD --disable_relay_log_purge --port=$CRL_PORT  >> $log_dir/purge_relay_logs.log 2>&1
* 스크립트내 CRL_USER 와 CRL_PASSWORD 변수에 DB 계정과 DB계정 패스워드를 입력하면 됩니다.
• 생성후 실행 권한 부여
[root]# chmod 755 /etc/masterha/clean_relay_log.sh
• crontab 에 등록시 - 6시간 마다 예시
0 6 * * * /etc/masterha/clean_relay_log.sh > /dev/null 2>&1
crontab에 직접 등록
스크립트 작성 없이 다음과 같이 직접 등록하여 사용할 수도 있습니다.
0 6 * * * /usr/local/bin/purge_relay_logs --user=mha --password=mha --disable_relay_log_purge --workdir=/masterha/app1 >> /masterha/app1/replay_purge_cron.log 2>&1
conclusion
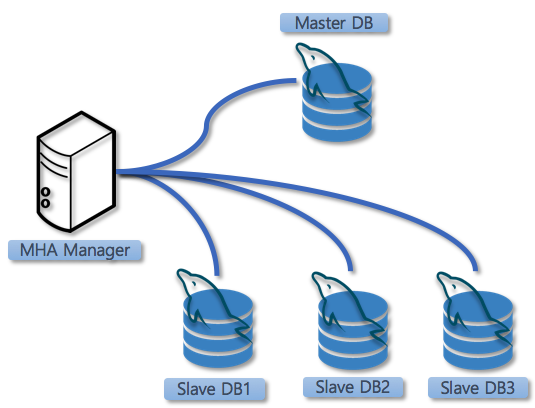
MHA(Master High Availability) 는 장애 발생시 사람이 일일이 수 작업으로 하기 힘든 작업에 대해서 자동화로 수행되도록 개발되었습니다.
Master 서버의 장애 발생시 빠르게 대응하여 수초 안으로 failover 가 이루어지며 1대 N 구조인 다수의 슬레이브인 환경에서 서버 별 복제의 Gap 차이의 복구 및 Replication 정보 수정 등의 작업을 자동적으로 수행하게 됩니다.
많은 곳에서 오래전부터 사용하던 툴로 안정성이나 기능면에서는 매우 좋다고 생각됩니다.
MySQL Replication 환경에서는 이런 유형의 가용성 솔루션을 사용하는 것이 빠른 장애 처리와 복구에 많은 도움이 것이라고 생각합니다.
Reference
Reference link
https://github.com/yoshinorim/mha4mysql-manager
https://github.com/yoshinorim/mha4mysql-node
https://github.com/yoshinorim/mha4mysql-manager/wiki
https://www2.slideshare.net/matsunobu/automated-master-failover
Reference Book
DBA를 위한 MySQL 운영 기술
연관된 다른 글


Principal DBA(MySQL, AWS Aurora, Oracle)
핀테크 서비스인 핀다에서 데이터베이스를 운영하고 있어요(at finda.co.kr)
Previous - 당근마켓, 위메프, Oracle Korea ACS / Fedora Kor UserGroup 운영중
Database 외에도 NoSQL , Linux , Python, Cloud, Http/PHP CGI 등에도 관심이 있습니다
purityboy83@gmail.com / admin@hoing.io


안녕하세요
보고 따라하는 도중에 막혀서 문의남깁니다..
위의 mha_change_vip.sh스크립트를 동일하게 작성해서 수행하게 되면 failover테스트 시 master vip가 down되지만 slave측에 vip가 up되지 않습니다..DB role은 정상적으로 바뀌구요ㅠ
혹시 스크립트 수정 사항이 있을까요?
안녕하세요
제 예상으로는 subnet 정보가 아마도 없어서 일것 같습니다.
스크립트에서
/bin/sudo /sbin/ifconfig enp0s3:0 $V_VIP_IP <- 이 부분을 아래와 같이 netmask 를 넣고 해봐주시겠어요?
예시)
/bin/sudo /sbin/ifconfig enp0s3:0 $V_VIP_IP netmask 255.255.255.0
netmask 정보는 사용하시는 시스템에 따라 다를수 있으니 네트워크 디바이스에서 직접 확인 해보시면 됩니다.
/sbin/ifconfig
스크립트는 조만간 수정 하도록 하겠습니다. 감사합니다.
첫 vip 로 맺은 공개키가 매니저서버에 남아있어서 그런것같은데 해결 방안이 있을까요
안녕하세요
ssh 사용시 아래 옵션도 넣고 해봐주시겠어요?
-o "StrictHostKeyChecking no"
감사합니다
오! 감사합니다. 이런 옵션이 있었군요..! 애용하게 될 것 같아요 덕분에 잘 됩니다 감사합니다^^!!
안녕하세요
last_failover_minute 이라는 옵션이 한번 fail-over 이후 해당 시간(분) 동안 이후의 장애 발생은 fail-over를 하지 않는다 라는 걸로 이해를 하였는데요,
포스팅 대로 구축을 해서 MHA 매니저 실행 후 fail-over가 발생하면 MHA 매니저 자체가 꺼져버리게 되는데, last_failover_minute 라는 옵션은 그럼 무의미한게 아닐까요..?
제가 이해를 잘 못하는거 같은데 부연 설명 좀 부탁 드립니다..!
매니저를 다시 시작을 해줘야하는 것은 맞으며 last_failover_minute 옵션은 옵션대로의 의미가 있는 것입니다
안녕하세요 문의사항이 있어 댓글 남깁니다.
감사합니다.
안녕하세요~
첫번째로 문의주신 replcheck 에러는 WorkAround 형태로 아래 문서를 참조해서 진행해보셔야 할것 같습니다.
https://code.google.com/archive/p/mysql-master-ha/issues/70
두번째 문의주신 부분은 진행하는 환경에 대한 사전 지식이나 배경 내용을 알수 없다보니 명확히 의견드리기가 다소 어려울것 같네요
이유나 환경적인 상세 설명이 더 필요할 것 같습니다. 가능하시면 조금 더 이유와 배경내용에 대해서 풀어서 설명을 부탁드릴게요
감사합니다.
안녕하세요
테스트 하다 진행이 안되는 부분이 있어 여쭤보고자 글을 남깁니다..
masterha_master_switch --master_state=alive --conf=/etc/masterha/app1.cnf --new_master_host=master --interactive=0
수행 시 아래 부분에서 행 걸린것처럼 진행이 안됩니다.
Fri Dec 9 03:44:01 2022 - [info] /masterha/scripts/master_ip_online_change --command=stop --orig_master_host=slave1 --orig_master_ip=192.168.37.132 --orig_master_port=3306 --orig_master_user='mha' --new_master_host=master --new_master_ip=192.168.37.131 --new_master_port=3306 --new_master_user='mha' --orig_master_ssh_user=mha --new_master_ssh_user=mha --orig_master_password=xxx --new_master_password=xxx
하여 바꾸고자 하는 master 노드의 processlist 확인해보았더니 set read_only=1 구문이 lock 이 걸려 진행되지 않는 것이였습니다. (start slave로 인해)
수동으로 stop slave 후에 set read_only 진행해야 하는 부분일까요 ?
글 내용에는 해당 부분이 없어서요.
안녕하세요
사용하시는 DB 가 MySQL 이신가요 MariaDB 이신가요?
버전이 어떻게 되시나요?
set read_only=1 구문이 lock 이 걸려 진행되지 않는 것이였습니다. (start slave로 인해)
라고 하셨는데 이부분 조금 더 자세하게 설명 한번 더 부탁드립니다.
감사합니다.
답변 감사합니다.
테스트 한 DBMS 는 MariaDB 입니다.
1. master/slave 를 다시 전환하기 위해 masterha_master_switch 를 수행함
2. master_ip_online_change 하는 부분에서 행이 걸린 것처럼 아무런 동작을 하지 않음
3. master로 돌리기 위한 slave 노드에서 processlist 확인해보니 master 노드에서 접속한 세션이 set read_only=1 작업을 수행하기 위해 lock 대기를 하는것이 확인됨.
이후 stop slave 를 수행하면 진행이 다시 이어지나 에러가 발생함.
안녕하세요
master_ip_online_change 파일의 149,244 라인 근처 주석처리 하셨는지요?
일단 현상 만으로는 무엇이라고 확인하기가 어렵네요
추가 코멘트 작성 주실때 이메일을 제외하고 작성 부탁드립니다.
감사합니다.
안녕하세요 궁금한게 있어서 질문 남겨봅니다.
혹시 vip 설정하는 것이 필수조건인가요 ?
proxysql 을 사용하여 서버의 물리적 ip를 이용하려 하는데요.
VIP를 가지고 서비스를 할게 아니라면 mha_change_vip 를 꼭 설정해야 하는가 싶어서요.
VIP를 굳이 설정하지 않아도 된다면
이 부분은 수정하지 않아도 되는건가요 ?
안녕하세요
2개 파일은 Master 인스턴스가 교체되는 과정에서의 VIP 형태로 접속을 처리하는 구성을 하고자 할때
사용하는 VIP 를 변경 및 매핑 해주는 로직을 위해 커스텀 스크립트를 추가해주는 것이 주된 이유 입니다.
그외 주석처리하는 부분은 하지 않고 진행을 먼저 테스트를 진행 해보셔도 좋을것 같네요
감사합니다.
안녕하세요 MHA를 구성 셋팅을 알려주셔서 감사합니다.
다만 masterha_master_switch를 테스트 하던도중 오류가 발생하여 질문드립니다.
혹시 아래와 같은부분에 mha 비밀번호를 입력할수있는 구간이 따로 있는지 질문드립니다.
--orig_master_password=xxx --new_master_password=xxx
안녕하세요
사용하시는 DB가 MySQL 인가요 아니면 MariaDB 인가요?
감사합니다.
사용하는 DB는 MySQL 입니다. switch 명령어를 실행시키면 MySQL 접근을 할 수 없다고 합니다..
안녕하세요
블로그의 문제가 있어서 수정하고 처리하느라, 답변이 늦었습니다.
해결이 되셨는지 모르겠네요
말씀하시는 DB계정 정보에 대해서는 MHA 를 기동하는데 사용 되는 conf 파일에 기술하면 됩니다.
해당 내용은 아래 글에 내용이 있습니다.
https://hoing.io/archives/9812
답변이 되셨는지 모르겠네요
좋은하루 되세요 감사합니다.
안녕하세요~ mha 설치중에 있는데요. 설치는 다 했는데,
스크립트 실행 과정에서,
[mhauser@manager bin]$ ./masterha_check_ssh --conf=/mha/conf/app1.cnf
Mon Oct 9 14:05:44 2023 - [warning] Global configuration file /etc/masterha_default.cnf not found. Skipping.
Mon Oct 9 14:05:44 2023 - [info] Reading application default configuration from /mha/conf/app1.cnf..
Mon Oct 9 14:05:44 2023 - [info] Reading server configuration from /mha/conf/app1.cnf..
Mon Oct 9 14:05:44 2023 - [info] Starting SSH connection tests..
Mon Oct 9 14:05:44 2023 - [error][/usr/local/share/perl5/MHA/SSHCheck.pm, ln63]
Mon Oct 9 14:05:44 2023 - [error][/usr/local/share/perl5/MHA/SSHCheck.pm, ln121] Use of uninitialized value in concatenation (.) or string at /usr/local/share/perl5/MHA/SSHCheck.pm line 104.
Mon Oct 9 14:05:45 2023 - [error][/usr/local/share/perl5/MHA/SSHCheck.pm, ln63]
Mon Oct 9 14:05:44 2023 - [error][/usr/local/share/perl5/MHA/SSHCheck.pm, ln121] Use of uninitialized value in concatenation (.) or string at /usr/local/share/perl5/MHA/SSHCheck.pm line 104.
SSH Configuration Check Failed!
at ./masterha_check_ssh line 44.
이렇게 나오면서 안되는데, 혹시 해결방법 있을까요..?ㅠㅠ
안녕하세요
혹시 서버간의 SSH 인증은 사전에 설정이 되어있는 상태인가요?