Last Updated on 9월 16, 2021 by Jade(정현호)
먼저 해당 글은 AWS EC2에 생성한 Ubuntu 18.04에서 Nginx+PHP-FPM+MaraiDB 스택환경 구성 후 워드프레스 구성 까지의 연재 포스팅 글 과 연계되어 이어지는 글 입니다.
[관련된 이전 글]
아마존 AWS 클라우드 프리티어 - 1 계정 가입/생성 - MFA OTP 설정
아마존 AWS 클라우드 프리티어 - 2 EC2(VM/VPS) 생성
아마존 AWS 클라우드 프리티어 - 3 탄력적 IP(고정IP) 인 Elastic IP 생성 및 할당
우분투(Ubuntu) 18.04 서버 초기 설정
우분투(Ubuntu) 시간 동기화 설정- Chrony
우분투(Ubuntu) 18.04 - LEMP(Nginx+PHP+MariaDB) 1 - 설치 및 초기 설정
웹 기반 mysql 관리툴 - phpmyadmin 설치 및 설정
freenom 에서 최상위 국가 무료 도메인 발급 받기
우분투(Ubuntu) 18.04 - Nginx+PHP+MariaDB 2 - Nginx 추가 설정
* CentOS 환경에서의 Nginx 에 Certbot 을 통한 무료 인증서 발급 내용은 아래 포스팅을 보시면 됩니다.

Contents
Diffie-Hellman Key 생성
먼저 Diffie-Hellman Key 키에 대해서 설명 간략하게 설명드리면, Diffie와 Hellman이 1976년도에 발표한 비밀키 교환 방식의 알고리즘입니다
Client와 Server가 각자 선택한 정수와 소수를 이용하여 비밀키를 만들고 이를 통해 데이터를 암호화 입니다.
DH, DHE, ECDHE가 있으며 DHE(2048bits), ECDHE를 쓰는 것이 가장 좋으며 Key Exchange 방식 중에서 가장 권고되는 방식(ECDHE) 라고 합니다
그래서 Diffie-Hellman 생성 하여 사용 할 것 입니다.
만들수 있는 키 길이는 1024 / 2048 / 4096bit 이 되고 4096bit 로 만드는것이 현재로는 가장 안전 합니다
다만 생성하는 시스템의 성능에 따라 10분이상 소요가 될 수도 있습니다.
그래서 먼저 Diffie-Hellman 생성을 터미널에 걸어두고 아래 내용을 진행 하시는게 좋을것 같습니다.
키 생성 위치는 nginx 의 디렉토리에 생성 하도록 하겠습니다.
생성 명령문은 아래와 같습니다.
ubuntu$ sudo openssl dhparam -out /etc/nginx/conf.d/ssl-dhparams.pem 4096
Let's Encrypt - 무료 인증서 발급
Let's Encrypt 는 사용자에게 무료로 SSL/TLS 인증서를 발급해주는 비영리기관이며 한번 발급 받으면
90일간 사용이 가능하고 만료 30일 전에 갱신이 가능 합니다
인증서 발급은 certbot 이나 certbot-auto 을 이용 하면 되며 certbot 이란 let's encrypt 인증서를 자동으로 발급/갱신해주는 봇(데몬) 입니다.
* certbot - 패키지로 설치시 , certbot-auto - letencrypt 에서 바이너리를 직접 받은 경우
* let's encrypt 에서 SSL을 발급 받기 위해서는 도메인이 필수 입니다. freenom 에서 최상위 국가의 무료 도메인을 발급 받아서 사용 할 수 있습니다.
아래 글을 참조하시면 되며 포스팅 진행과정에서도 freenom 에서 발급받은 도메인을 사용 하고 있습니다

certbot 설치
Repository 등록
certbot을 설치 하기 위해 먼저 repository 를 등록 합니다.
ubuntu$ sudo apt-get update
ubuntu$ sudo apt-get install software-properties-common
ubuntu$ sudo add-apt-repository universe
ubuntu$ sudo add-apt-repository ppa:certbot/certbot
ubuntu$ sudo apt-get update
certbot 설치
ubuntu$ sudo apt-get install certbot
Certbot nginx plugin 설치
ubuntu$ sudo apt-get install python-certbot-nginx
인증서 발급
아래 certbot 명령어를 통해 SSL인증서를 발급 받을 수 있습니다.
이메일 및 이용약관 동의를 미리 입력 해둔 것입니다.
ubuntu$ sudo certbot --nginx --email admin@h2code.cf --agree-tos
참고) 위와 같이 수행하면 certbot이 nginx 의 설정파일을 참조하여 등록된 모든 호스트에 대해서 인증서 발급을 받을 수 있습니다
(인증서는 각각 1개씩 받거나 or 1개 인증서에서 여러개 도메인이 등록 된 형태로 발급 받거나)
아래 처럼 특정 도메인을 입력하게 되면 해당 도메인에 대해서만 진행 됩니다.
ubuntu$ sudo certbot --nginx -d www.h2code.cf --email admin@h2code.cf --agree-tos
실행 하게 되면 아래와 같은 내용이 나오게 됩니다.
Saving debug log to /var/log/letsencrypt/letsencrypt.log
Plugins selected: Authenticator nginx, Installer nginx
- - - - - - - - - - - - - - - - - - - - - - - - - - - - - - - - - - - - - - - -
Would you be willing to share your email address with the Electronic Frontier
Foundation, a founding partner of the Let's Encrypt project and the non-profit
organization that develops Certbot? We'd like to send you email about our work
encrypting the web, EFF news, campaigns, and ways to support digital freedom.
- - - - - - - - - - - - - - - - - - - - - - - - - - - - - - - - - - - - - - - -
(Y)es/(N)o: n
<== 이메일로 news 같은 소식을 받을 건지를 물어보는 것입니다 N 를 해도 됩니다.
Which names would you like to activate HTTPS for?
- - - - - - - - - - - - - - - - - - - - - - - - - - - - - - - - - - - - - - - -
1: h2code.cf
2: myadmin.h2code.cf
3: opcache.h2code.cf
4: www.h2code.cf
- - - - - - - - - - - - - - - - - - - - - - - - - - - - - - - - - - - - - - - -
Select the appropriate numbers separated by commas and/or spaces, or leave input
blank to select all options shown (Enter 'c' to cancel): [엔터]
<= nginx에 등록된 4개의 호스트가 모두 리스트 업되며 각각 받을 것인지 아님 모두 한 꺼번에 받을 것인지를 선택 하게 됩니다.
엔터를 입력하면 1개의 인증서에 4개의 도메인이 모두 등록되게 됩니다.
포스팅에서는 엔터를 입력하여 모두 등록 하였습니다.
Obtaining a new certificate
Performing the following challenges:
http-01 challenge for h2code.cf
http-01 challenge for myadmin.h2code.cf
http-01 challenge for opcache.h2code.cf
http-01 challenge for www.h2code.cf
Waiting for verification...
Cleaning up challenges
Deploying Certificate to VirtualHost /etc/nginx/conf.d/default.conf
Deploying Certificate to VirtualHost /etc/nginx/conf.d/default.conf
Deploying Certificate to VirtualHost /etc/nginx/conf.d/default.conf
Deploying Certificate to VirtualHost /etc/nginx/conf.d/default.conf
Please choose whether or not to redirect HTTP traffic to HTTPS, removing HTTP access.
- - - - - - - - - - - - - - - - - - - - - - - - - - - - - - - - - - - - - - - -
1: No redirect - Make no further changes to the webserver configuration.
2: Redirect - Make all requests redirect to secure HTTPS access. Choose this for
new sites, or if you're confident your site works on HTTPS. You can undo this
change by editing your web server's configuration.
- - - - - - - - - - - - - - - - - - - - - - - - - - - - - - - - - - - - - - - -
Select the appropriate number [1-2] then [enter] (press 'c' to cancel): 2
<== 이부분은 HTTPS 로 Redirect 로의 설정을 대신 certbot이 해줄것인지 아닌 지를 선택하는 부분입니다.
2번을 선택하면 certbot이 기존의 conf 파일에서 redirect 구문을 추가하고 포트 변경 ,ssl_ciphers,ssl_protocols 정보를 모두 다 설정해주게 됩니다.
포스팅에서는 여기서 2번을 선택하였습니다.
Redirecting all traffic on port 80 to ssl in /etc/nginx/conf.d/default.conf
Redirecting all traffic on port 80 to ssl in /etc/nginx/conf.d/default.conf
Redirecting all traffic on port 80 to ssl in /etc/nginx/conf.d/default.conf
Redirecting all traffic on port 80 to ssl in /etc/nginx/conf.d/default.conf
- - - - - - - - - - - - - - - - - - - - - - - - - - - - - - - - - - - - - - - -
Congratulations! You have successfully enabled https://h2code.cf,
https://myadmin.h2code.cf, https://opcache.h2code.cf, and https://www.h2code.cf
You should test your configuration at:
https://www.ssllabs.com/ssltest/analyze.html?d=h2code.cf
https://www.ssllabs.com/ssltest/analyze.html?d=myadmin.h2code.cf
https://www.ssllabs.com/ssltest/analyze.html?d=opcache.h2code.cf
https://www.ssllabs.com/ssltest/analyze.html?d=www.h2code.cf
- - - - - - - - - - - - - - - - - - - - - - - - - - - - - - - - - - - - - - - -
IMPORTANT NOTES:
- Congratulations! Your certificate and chain have been saved at:
/etc/letsencrypt/live/h2code.cf/fullchain.pem
Your key file has been saved at:
/etc/letsencrypt/live/h2code.cf/privkey.pem
Your cert will expire on 2021-01-24. To obtain a new or tweaked
version of this certificate in the future, simply run certbot again
with the "certonly" option. To non-interactively renew *all* of
your certificates, run "certbot renew"
- Your account credentials have been saved in your Certbot
configuration directory at /etc/letsencrypt. You should make a
secure backup of this folder now. This configuration directory will
also contain certificates and private keys obtained by Certbot so
making regular backups of this folder is ideal.
- If you like Certbot, please consider supporting our work by:
Donating to ISRG / Let's Encrypt: https://letsencrypt.org/donate
Donating to EFF: https://eff.org/donate-le
생성이 완료 되었고 만료 기간은 2021-01-24 으로 안내되고 있으며, 키 파일은 /etc/letsencrypt/live/h2code.cf 아래 위치하고 있음을 알려줍니다.
certbot에서 인증서를 발급 받게 되면 CentOS 나 Ubuntu나 모두 /etc/letsencrypt/live/ 아래 경로로 생성되게 됩니다(경로는 동일)
인증서 발급 내역 확인
ubuntu$ sudo certbot certificates
Saving debug log to /var/log/letsencrypt/letsencrypt.log
- - - - - - - - - - - - - - - - - - - - - - - - - - - - - - - - - - - - - - - -
Found the following certs:
Certificate Name: h2code.cf
Domains: h2code.cf myadmin.h2code.cf opcache.h2code.cf www.h2code.cf
Expiry Date: 2021-01-24 02:21:40+00:00 (VALID: 89 days)
Certificate Path: /etc/letsencrypt/live/h2code.cf/fullchain.pem
Private Key Path: /etc/letsencrypt/live/h2code.cf/privkey.pem
- - - - - - - - - - - - - - - - - - - - - - - - - - - - - - - - - - - - - - -
인증서 추가 설정 및 Nginx 재시작
몇가지 내용을 변경 후에 nginx 를 재기동 하겠습니다.
우선 conf.d 디렉토리로 이동 후 conf 파일을 살펴보면 아래와 같이 Certbot에 의해 자동적으로 설정된 내역을 확일 할 수 있습니다.
ubuntu$ cd /etc/nginx/conf.d
ubuntu$ sudo vi default.conf
server {
if ($host = www.h2code.cf) {
return 301 https://$host$request_uri;
} # managed by Certbot
ssl_ciphers 설정과 ssl_protocols 설정은 별도의 파일로 생성 되어 있으며 각 Server Block 마다 아래와 같이 include가 되어 있습니다.
include /etc/letsencrypt/options-ssl-nginx.conf;
options-ssl-nginx.conf 수정
options-ssl-nginx.conf 파일을 열어서 ssl_protocols 을 수정 하도록 하겠습니다.
ubuntu$ sudo vi /etc/letsencrypt/options-ssl-nginx.conf
#ssl_protocols TLSv1 TLSv1.1 TLSv1.2;
-> 기존 내역 주석처리 합니다.
ssl_protocols TLSv1.2 TLSv1.3;
-> 이와 같이 입력 합니다. TLSv1.2 와 TLS1.3 만 사용한다를 의미 합니다.
[참고] TLSv1.3 은 openssl 1.1.1 이상 , nginx 1.13.0 에서 사용 할 수 있습니다.
현재 시스템의 openssl은 1.1.1g 이기 때문에 사용이 가능 합니다.
ubuntu$ nginx -V
built with OpenSSL 1.1.1 11 Sep 2018
사용 하시는 Nginx의 OpenSSL버전이 1.1.1 이하 버전이라면 아래와 같이 TLSv1.2 만 사용하시면 됩니다.
ssl_protocols TLSv1.2
그리고 아래에 아래 옵션을 추가/변경 합니다
ssl_ciphers 는 기존에 있던 내용을 주석 처리 합니다.
ssl_stapling on;
ssl_stapling_verify on;
ssl_prefer_server_ciphers on;
ssl_ciphers "ECDHE-ECDSA-CHACHA20-POLY1305:ECDHE-RSA-CHACHA20-POLY1305:ECDHE-ECDSA-AES128-GCM-SHA256:ECDHE-RSA-AES128-GCM-SHA256:ECDHE-ECDSA-AES256-GCM-SHA384:ECDHE-RSA-AES256-GCM-SHA384:DHE-RSA-AES128-GCM-SHA256:DHE-RSA-AES256-GCM-SHA384:ECDHE-ECDSA-AES128-SHA256:ECDHE-RSA-AES128-SHA256:ECDHE-ECDSA-AES128-SHA:ECDHE-RSA-AES256-SHA384:ECDHE-RSA-AES128-SHA:ECDHE-ECDSA-AES256-SHA384:ECDHE-ECDSA-AES256-SHA:ECDHE-RSA-AES256-SHA:DHE-RSA-AES128-SHA256:DHE-RSA-AES128-SHA:DHE-RSA-AES256-SHA256:DHE-RSA-AES256-SHA:ECDHE-ECDSA-DES-CBC3-SHA:ECDHE-RSA-DES-CBC3-SHA:EDH-RSA-DES-CBC3-SHA:AES128-GCM-SHA256:AES256-GCM-SHA384:AES128-SHA256:AES256-SHA256:AES128-SHA:AES256-SHA:DES-CBC3-SHA:!DSS";
그 다음은 위에서 생성한 Diffie-Hellman Key 를 사용하도록 letsencrypt 의 키와 교체하도록 하겠습니다.
certbot 를 이용하여 redirect 및 ssl 설정을 하게 되면 아래와 같이 letsencrypt 에서 생성한 Diffi-Hellman Key 를 사용하는 내용으로 모든 Server Block 에 입력되게 되어 있습니다.
하여 일일이 설정을 변경하기 보다는 참조하는 키를 변경 하도록 하겠습니다.
기존 파일명 변경
먼저 letsencrypt 에 있는 기존 Diffie-Hellman Key 의 이름을 변경 합니다(백업)
ubuntu$ cd /etc/letsencrypt/
ubuntu$ sudo mv ssl-dhparams.pem ssl-dhparams.pem.letsencrypt
별도로 생성한 키 파일 복사
ubuntu$ sudo cp -rp /etc/nginx/conf.d/ssl-dhparams.pem /etc/letsencrypt/
Nginx 를 restart 합니다.
ubuntu$ sudo systemctl restart nginx
인증서 테스트 및 확인
SSL 설정에 대한 체크는 아래 사이트를 통해 할 수 있습니다.

테스트 결과 A+ 로 양호하게 설정 되었음을 확인 할수 있습니다.
아래 링크 통해 설정된 SSL/TLS 버전을 확인 해 볼 수 있습니다.
https://www.cdn77.com/tls-test
https://gf.dev/tls-test
설정한 것과 같이 TLSv1.2 와 TLSv1.3만 사용되는 걸 확인 할 수 있습니다.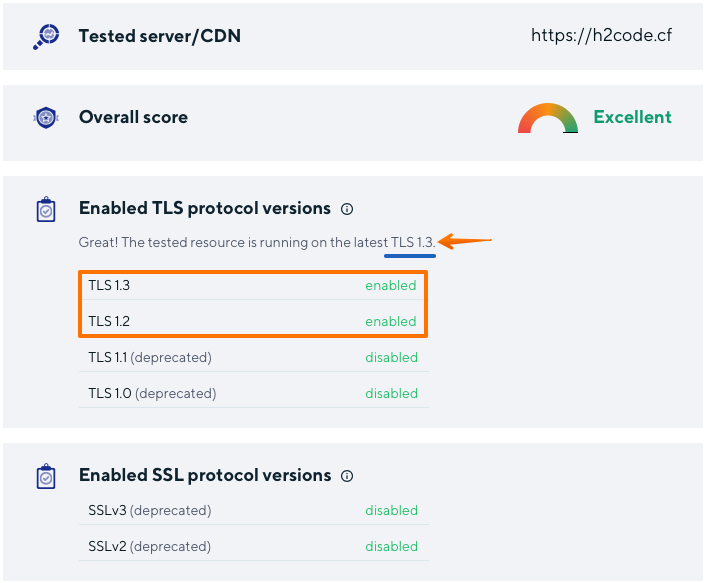
인증서 서브 도메인 변경
서브 도메인의 추가나 서브도메인의 삭제는 이전의 명령어를 다시 수행하면 됩니다.
그전에 nginx 의 conf.d/default.conf 과 그외 설정파일에서 Server block 을 추가 하거나 제외하여 nginx 먼저 설정을 변경 한 후에 certbot 을 수행 하면 되겠습니다.
ubuntu$ sudo certbot --nginx --email admin@h2code.cf --agree-tos
Saving debug log to /var/log/letsencrypt/letsencrypt.log
Plugins selected: Authenticator nginx, Installer nginx
Which names would you like to activate HTTPS for?
- - - - - - - - - - - - - - - - - - - - - - - - - - - - - - - - - - - - - - - -
1: h2code.cf
2: myadmin.h2code.cf
3: opcache.h2code.cf
4: wp.h2code.cf
5: www.h2code.cf
- - - - - - - - - - - - - - - - - - - - - - - - - - - - - - - - - - - - - - - -
Select the appropriate numbers separated by commas and/or spaces, or leave input
blank to select all options shown (Enter 'c' to cancel): [엔터]
- - - - - - - - - - - - - - - - - - - - - - - - - - - - - - - - - - - - - - - -
You have an existing certificate that contains a portion of the domains you
requested (ref: /etc/letsencrypt/renewal/h2code.cf.conf)
It contains these names: h2code.cf, myadmin.h2code.cf, opcache.h2code.cf,
www.h2code.cf
You requested these names for the new certificate: h2code.cf, myadmin.h2code.cf,
opcache.h2code.cf, wp.h2code.cf, www.h2code.cf.
Do you want to expand and replace this existing certificate with the new
certificate?
- - - - - - - - - - - - - - - - - - - - - - - - - - - - - - - - - - - - - - - -
(E)xpand/(C)ancel: E
<-- 기존 도메인에서 1개 더 추가하는 것이라서 E 를 입력 합니다.
Renewing an existing certificate
Performing the following challenges:
http-01 challenge for wp.h2code.cf
Waiting for verification...
Cleaning up challenges
Deploying Certificate to VirtualHost /etc/nginx/conf.d/default.conf
Deploying Certificate to VirtualHost /etc/nginx/conf.d/default.conf
Deploying Certificate to VirtualHost /etc/nginx/conf.d/default.conf
Deploying Certificate to VirtualHost /etc/nginx/conf.d/default.conf
Deploying Certificate to VirtualHost /etc/nginx/conf.d/default.conf
Please choose whether or not to redirect HTTP traffic to HTTPS, removing HTTP access.
- - - - - - - - - - - - - - - - - - - - - - - - - - - - - - - - - - - - - - - -
1: No redirect - Make no further changes to the webserver configuration.
2: Redirect - Make all requests redirect to secure HTTPS access. Choose this for
new sites, or if you're confident your site works on HTTPS. You can undo this
change by editing your web server's configuration.
- - - - - - - - - - - - - - - - - - - - - - - - - - - - - - - - - - - - - - - -
Select the appropriate number [1-2] then [enter] (press 'c' to cancel): 2
<==Redirect 구문 자동 생성 여부 입니다, 생성하기 위해서 2 를 입력 합니다.
Traffic on port 80 already redirecting to ssl in /etc/nginx/conf.d/default.conf
Traffic on port 80 already redirecting to ssl in /etc/nginx/conf.d/default.conf
Traffic on port 80 already redirecting to ssl in /etc/nginx/conf.d/default.conf
Redirecting all traffic on port 80 to ssl in /etc/nginx/conf.d/default.conf
Traffic on port 80 already redirecting to ssl in /etc/nginx/conf.d/default.conf
- - - - - - - - - - - - - - - - - - - - - - - - - - - - - - - - - - - - - - - -
Your existing certificate has been successfully renewed, and the new certificate
has been installed.
The new certificate covers the following domains: https://h2code.cf,
https://myadmin.h2code.cf, https://opcache.h2code.cf, https://wp.h2code.cf, and
https://www.h2code.cf
You should test your configuration at:
https://www.ssllabs.com/ssltest/analyze.html?d=h2code.cf
https://www.ssllabs.com/ssltest/analyze.html?d=myadmin.h2code.cf
https://www.ssllabs.com/ssltest/analyze.html?d=opcache.h2code.cf
https://www.ssllabs.com/ssltest/analyze.html?d=wp.h2code.cf
https://www.ssllabs.com/ssltest/analyze.html?d=www.h2code.cf
- - - - - - - - - - - - - - - - - - - - - - - - - - - - - - - - - - - - - - - -
IMPORTANT NOTES:
- Congratulations! Your certificate and chain have been saved at:
/etc/letsencrypt/live/h2code.cf/fullchain.pem
Your key file has been saved at:
/etc/letsencrypt/live/h2code.cf/privkey.pem
Your cert will expire on 2021-01-24. To obtain a new or tweaked
version of this certificate in the future, simply run certbot again
with the "certonly" option. To non-interactively renew *all* of
your certificates, run "certbot renew"
- If you like Certbot, please consider supporting our work by:
Donating to ISRG / Let's Encrypt: https://letsencrypt.org/donate
Donating to EFF: https://eff.org/donate-le
완료 된 후 /etc/nginx/conf.d/default.conf 파일의 내용을 보면 신규로 생성한것과 동일하게 추가 된 도메인에 대해서도 redirect 가 자동적으로 생성된 걸 확인 할 수 있습니다.
확인 후 nginx을 재기동 or reload 를 한번 수행 합니다.
ubuntu$ sudo systemctl reload nginx
or
ubuntu$ sudo systemctl restart nginx
인증서 삭제
아래와 같이 certbot delete 명령어를 통해 대화형으로 SSL인증서를 삭제 할 수 있습니다.
ubuntu$ sudo certbot delete
Saving debug log to /var/log/letsencrypt/letsencrypt.log
Which certificate(s) would you like to delete?
- - - - - - - - - - - - - - - - - - - - - - - - - - - - - - - - - - - - - - - -
1: www.hoing.io-0001
2: www.hoing.io
3: www.fedoralinux.or.kr
- - - - - - - - - - - - - - - - - - - - - - - - - - - - - - - - - - - - - - - -
Select the appropriate numbers separated by commas and/or spaces, or leave input
blank to select all options shown (Enter 'c' to cancel): 1
- - - - - - - - - - - - - - - - - - - - - - - - - - - - - - - - - - - - - - - -
Deleted all files relating to certificate www.hoing.io-0001.
- - - - - - - - - - - - - - - - - - - - - - - - - - - - - - - - - - - - - - - -
인증서 만료 일자 갱신
letsencrypt의 SSL 인증서의 유효기간은 90일 입니다
90일이 되기전에 갱신이 필요 합니다.
인증서 갱신 명령어
(갱신 후 nginx 재시작 이나 reload 필요)
ubuntu$ sudo /usr/bin/certbot renew
* 갱신은 인증서 만료 30일 이전에 가능 합니다.
crontab 에 등록하여 한달에 한번 갱신명령어가 수행되게 스케줄을 설정 하도록 하겠습니다.
ubuntu$ sudo crontab -e
## 아래 내용 추가
0 6 15 * * /usr/bin/certbot renew --renew-hook "/bin/systemctl reload nginx"
* 매월 15일 06시 00분에 수행을 하게 되고 renew(갱신)이 완료 되면 nginx 를 reload 하게 됩니다.
* 만료 30일 이전에 갱신 가능함으로 한달에 한번 정도만 수행 해줘도 됩니다.
crontab 내용 확인
ubuntu$ sudo crontab -l
0 6 15 * * /usr/bin/certbot renew --renew-hook "/bin/systemctl reload nginx"
HTTP/2
HTTP/2(Hypertext Transfer Protocol Version 2)는 월드 와이드 웹에서 쓰이는 HTTP 프로토콜의 두 번째 버전입니다.
SPDY에 기반하고 있으며, 국제 인터넷 표준화 기구(IETF)에서 개발되고 있습니다.
1997년 RFC 2068로 표준이 된 HTTP 1.1을 개선한 것으로, 2014년 12월 표준안 제안(Proposed Standard)으로 고려되어,
2015년 2월 17일 IESG에서 제안안으로 승인되었고 2015년 5월, RFC 7540로 공개되었습니다.
자세한 내용은 아래 링크를 확인 해보시면 됩니다.
[참고]
HTTP2 를 사용 하기 위해서는 openssl 1.0.2 버전이상 , Nginx 1.9.5 버전 이상이 필요하고 HTTPS 설정도 되어 있어야 합니다.
HTTP/2 설정 및 적용 여부 확인
Server Block 내 내용을 추가 하기 위해서 conf 디렉토리로 이동합니다.
ubuntu$ cd /etc/nginx/conf.d
사용하는 conf 파일을 편집하여 내용을 추가/ 변경 합니다.
ubuntu$ sudo vi default.conf
server block내 listen 부분에 http2 옵션을 추가 해주면 됩니다.
listen 80 ;
to
listen 80 http2;
listen 443 ssl;
to
listen 443 ssl http2;
기본이 되는 server block에는 default_server 도 같이 사용 할 수 있습니다.
listen 80 default_server http2;
listen 443 ssl default_server http2;
[참고] default_server 는 server 절이 여러개 있을 때 IP로 접속 하거나 없는 서브도메인 등으로 접속시 default 로 접속을 하게 되는 sever block을 의미 합니다.
==> server {} 중에서 한곳만 사용 할 수 있습니다
설정을 저장 한 후 nginx을 재시작 합니다.
ubuntu$ sudo systemctl restart nginx
HTTP2 적용이 되고 있는지에 대한 체크는 아래 사이트를 통해 확인 하실수 있습니다.
HTTP/2 로 동작한다면 아래와 같은 내용을 확인 할 수 있습니다.
이어지는 다음글 : WordPress(워드프레스) 설치/구성 및 스팸방지 설정

연관된 글


Principal DBA(MySQL, AWS Aurora, Oracle)
핀테크 서비스인 핀다에서 데이터베이스를 운영하고 있어요(at finda.co.kr)
Previous - 당근마켓, 위메프, Oracle Korea ACS / Fedora Kor UserGroup 운영중
Database 외에도 NoSQL , Linux , Python, Cloud, Http/PHP CGI 등에도 관심이 있습니다
purityboy83@gmail.com / admin@hoing.io











좋은 글 감사합니다. 가장 디테일하고 정성껏 작성해주셔서 문제해결및 공부에 많은 도움이 됐습니다.
도움이 되었다니 다행이네요
코멘트 감사합니다
좋은 하루 되세요